


カメラを使ってみるため、https://developer.android.com/samples/からCamera2Basicをダウンロード。
Android Studioに"Import Project"で読み込む。

サンプルにはGradle Wrapperが含まれていて、指定のSDK build tool versionがインストールされていない場合、ダウンロードしてインストールするようになっている。 Gradle Toolのバージョンも指定があり、最新版に更新するようメッセージが出るが、どちらも指定通りのバージョンのままでビルドする。
カメラアプリとして動作することが確認できた。シャッター音がせず、無音カメラになる。

マニフェストファイルAndroidManifest.xmlから抜粋。
    <uses-permission android:name="android.permission.CAMERA" />

    <uses-feature android:name="android.hardware.camera" />
<uses-feature android:name="android.hardware.camera.autofocus" />レイアウトファイルfragment_camera2_basic.xmlはオリジナルのままだとNGで、横向きにするとボタンが見えなくなる。
横向き修正版。
<RelativeLayout xmlns:android="http://schemas.android.com/apk/res/android"
    android:layout_width="match_parent"
    android:layout_height="match_parent">

    <com.example.android.camera2basic.AutoFitTextureView
        android:id="@+id/texture"
        android:layout_width="wrap_content"
        android:layout_height="wrap_content"
        android:layout_alignParentStart="true"
        android:layout_alignParentTop="true" />

    <FrameLayout
        android:id="@+id/control"
        android:layout_width="112dp"
        android:layout_height="match_parent"
        android:layout_alignParentBottom="true"
        android:layout_alignParentEnd="true"
        android:background="@color/control_background"
        android:orientation="horizontal">

        <Button
            android:id="@+id/picture"
            android:layout_width="wrap_content"
            android:layout_height="wrap_content"
            android:layout_gravity="center"
            android:text="@string/picture" />

        <ImageButton
            android:id="@+id/info"
            style="@android:style/Widget.Material.Light.Button.Borderless"
            android:layout_width="wrap_content"
            android:layout_height="wrap_content"
            android:layout_gravity="center_horizontal|bottom"
            android:contentDescription="@string/description_info"
            android:padding="20dp"
            android:src="@drawable/ic_action_info" />


    </FrameLayout>

</RelativeLayout>
縦向き修正版。
<RelativeLayout xmlns:android="http://schemas.android.com/apk/res/android"
    android:layout_width="match_parent"
    android:layout_height="match_parent">

    <com.example.android.camera2basic.AutoFitTextureView
        android:id="@+id/texture"
        android:layout_width="wrap_content"
        android:layout_height="wrap_content"
        android:layout_alignParentStart="true"
        android:layout_alignParentTop="true" />

    <FrameLayout
        android:id="@+id/control"
        android:layout_width="match_parent"
        android:layout_height="112dp"
        android:layout_alignParentBottom="true"
        android:layout_alignParentStart="true"
        android:background="@color/control_background">

        <Button
            android:id="@+id/picture"
            android:layout_width="wrap_content"
            android:layout_height="wrap_content"
            android:layout_gravity="center"
            android:text="@string/picture" />

        <ImageButton
            android:id="@+id/info"
            android:contentDescription="@string/description_info"
            style="@android:style/Widget.Material.Light.Button.Borderless"
            android:layout_width="wrap_content"
            android:layout_height="wrap_content"
            android:layout_gravity="center_vertical|end"
            android:padding="20dp"
            android:src="@drawable/ic_action_info" />

    </FrameLayout>

</RelativeLayout>CameraActivity.javaはフラグメントを置き換えるだけなので、Camera2BasicFragment.javaのフラグメントを見る。
startBackgroundThread()でバックグラウンドスレッドを開始している。
    @Override
    public void onResume() {
        super.onResume();
        startBackgroundThread();
        if (mTextureView.isAvailable()) {
            openCamera(mTextureView.getWidth(), mTextureView.getHeight());
        } else {
            mTextureView.setSurfaceTextureListener(mSurfaceTextureListener);
        }
}スレッド関連の構造を理解するため、Thread、Looper、Handlerなど、詳しく追ってみる。
    private void startBackgroundThread() {
        mBackgroundThread = new HandlerThread("CameraBackground");
        mBackgroundThread.start();
        mBackgroundHandler = new Handler(mBackgroundThread.getLooper());
}まずHandlerThreadクラスのインスタンスを作っている。コンストラクタは
    public HandlerThread(String name) {
        super(name);
        mPriority = Process.THREAD_PRIORITY_DEFAULT;
}superクラスはThreadなので、
public Thread(String name) {
        init(null, null, name, 0);
}initメソッドは
private void init(ThreadGroup g, Runnable target, String name, long stackSize) {
        Thread parent = currentThread();
        if (g == null) {
            g = parent.getThreadGroup();
        }

        g.addUnstarted();
        this.group = g;

        this.target = target;
        this.priority = parent.getPriority();
        this.daemon = parent.isDaemon();
        setName(name);

        init2(parent);

        /* Stash the specified stack size in case the VM cares */
        this.stackSize = stackSize;
        tid = nextThreadID();
    }
ここでは主に、
を行っている。
次に、
mBackgroundThread.start();でスレッドを開始している。具体的には、
    public synchronized void start() {
        // Android-changed: throw if 'started' is true
        if (threadStatus != 0 || started)
            throw new IllegalThreadStateException();

        group.add(this);

        started = false;
        try {
            nativeCreate(this, stackSize, daemon);
            started = true;
        } finally {
            try {
                if (!started) {
                    group.threadStartFailed(this);
                }
            } catch (Throwable ignore) {
                /* do nothing. If start0 threw a Throwable then
                  it will be passed up the call stack */
            }
        }
}nativeCreate()はAndroid Runtime (ART)のネイティブメソッドで、C++で記述されている。
static void Thread_nativeCreate(JNIEnv* env, jclass, jobject java_thread, jlong stack_size,
                                jboolean daemon) {
  // There are sections in the zygote that forbid thread creation.
  Runtime* runtime = Runtime::Current();
  if (runtime->IsZygote() && runtime->IsZygoteNoThreadSection()) {
    jclass internal_error = env->FindClass("java/lang/InternalError");
    CHECK(internal_error != nullptr);
    env->ThrowNew(internal_error, "Cannot create threads in zygote");
    return;
  }
  Thread::CreateNativeThread(env, java_thread, stack_size, daemon == JNI_TRUE);
}上記はJNIで、本体のCreateNativeThreadクラスは以下。
void Thread::CreateNativeThread(JNIEnv* env, jobject java_peer, size_t stack_size, bool is_daemon) {
  CHECK(java_peer != nullptr);
  Thread* self = static_cast<JNIEnvExt*>(env)->GetSelf();
  if (VLOG_IS_ON(threads)) {
    ScopedObjectAccess soa(env);
    ArtField* f = jni::DecodeArtField(WellKnownClasses::java_lang_Thread_name);
    ObjPtr<mirror::String> java_name =
        f->GetObject(soa.Decode<mirror::Object>(java_peer))->AsString();
    std::string thread_name;
    if (java_name != nullptr) {
      thread_name = java_name->ToModifiedUtf8();
    } else {
      thread_name = "(Unnamed)";
    }
    VLOG(threads) << "Creating native thread for " << thread_name;
    self->Dump(LOG_STREAM(INFO));
  }
  Runtime* runtime = Runtime::Current();
  // Atomically start the birth of the thread ensuring the runtime isn't shutting down.
  bool thread_start_during_shutdown = false;
  {
    MutexLock mu(self, *Locks::runtime_shutdown_lock_);
    if (runtime->IsShuttingDownLocked()) {
      thread_start_during_shutdown = true;
    } else {
      runtime->StartThreadBirth();
    }
  }
  if (thread_start_during_shutdown) {
    ScopedLocalRef<jclass> error_class(env, env->FindClass("java/lang/InternalError"));
    env->ThrowNew(error_class.get(), "Thread starting during runtime shutdown");
    return;
  }
  Thread* child_thread = new Thread(is_daemon);
  // Use global JNI ref to hold peer live while child thread starts.
  child_thread->tlsPtr_.jpeer = env->NewGlobalRef(java_peer);
  stack_size = FixStackSize(stack_size);
  // Thread.start is synchronized, so we know that nativePeer is 0, and know that we're not racing
  // to assign it.
  env->SetLongField(java_peer, WellKnownClasses::java_lang_Thread_nativePeer,
                    reinterpret_cast<jlong>(child_thread));
  // Try to allocate a JNIEnvExt for the thread. We do this here as we might be out of memory and
  // do not have a good way to report this on the child's side.
  std::string error_msg;
  std::unique_ptr<JNIEnvExt> child_jni_env_ext(
      JNIEnvExt::Create(child_thread, Runtime::Current()->GetJavaVM(), &error_msg));
  int pthread_create_result = 0;
  if (child_jni_env_ext.get() != nullptr) {
    pthread_t new_pthread;
    pthread_attr_t attr;
    child_thread->tlsPtr_.tmp_jni_env = child_jni_env_ext.get();
    CHECK_PTHREAD_CALL(pthread_attr_init, (&attr), "new thread");
    CHECK_PTHREAD_CALL(pthread_attr_setdetachstate, (&attr, PTHREAD_CREATE_DETACHED),
                       "PTHREAD_CREATE_DETACHED");
    CHECK_PTHREAD_CALL(pthread_attr_setstacksize, (&attr, stack_size), stack_size);
    pthread_create_result = pthread_create(&new_pthread,
                                           &attr,
                                           Thread::CreateCallback,
                                           child_thread);
    CHECK_PTHREAD_CALL(pthread_attr_destroy, (&attr), "new thread");
    if (pthread_create_result == 0) {
      // pthread_create started the new thread. The child is now responsible for managing the
      // JNIEnvExt we created.
      // Note: we can't check for tmp_jni_env == nullptr, as that would require synchronization
      //       between the threads.
      child_jni_env_ext.release();
      return;
    }
  }
  // Either JNIEnvExt::Create or pthread_create(3) failed, so clean up.
  {
    MutexLock mu(self, *Locks::runtime_shutdown_lock_);
    runtime->EndThreadBirth();
  }
  // Manually delete the global reference since Thread::Init will not have been run.
  env->DeleteGlobalRef(child_thread->tlsPtr_.jpeer);
  child_thread->tlsPtr_.jpeer = nullptr;
  delete child_thread;
  child_thread = nullptr;
  // TODO: remove from thread group?
  env->SetLongField(java_peer, WellKnownClasses::java_lang_Thread_nativePeer, 0);
  {
    std::string msg(child_jni_env_ext.get() == nullptr ?
        StringPrintf("Could not allocate JNI Env: %s", error_msg.c_str()) :
        StringPrintf("pthread_create (%s stack) failed: %s",
                                 PrettySize(stack_size).c_str(), strerror(pthread_create_result)));
    ScopedObjectAccess soa(env);
    soa.Self()->ThrowOutOfMemoryError(msg.c_str());
  }
}Thread::CreateCallbackから、Java側のThread.run()が呼び出される。
    @Override
    public void run() {
        mTid = Process.myTid();
        Looper.prepare();
        synchronized (this) {
            mLooper = Looper.myLooper();
            notifyAll();
        }
        Process.setThreadPriority(mPriority);
        onLooperPrepared();
        Looper.loop();
        mTid = -1;
}Looper.prepare()メソッドは以下。Looperはクラス外部からprivateコンストラクタにアクセスできず、代わりにLooper.prepare()が用意されている。
    private static void prepare(boolean quitAllowed) {
        if (sThreadLocal.get() != null) {
            throw new RuntimeException("Only one Looper may be created per thread");
        }
        sThreadLocal.set(new Looper(quitAllowed));
}sThreadLocalはThreadLocalクラスで、同一スレッド内だけからアクセス可能な、スレッド内で1つだけ存在する変数を作成できる。
static final ThreadLocal<Looper> sThreadLocal = new ThreadLocal<Looper>();prepare()メソッド内でnew Looper()を生成し、set()メソッドでThreadLocal変数として保持する。
Looperコンストラクタは、
    private Looper(boolean quitAllowed) {
        mQueue = new MessageQueue(quitAllowed);
        mThread = Thread.currentThread();
}Looper.prepare()の後、synchronized文でmBackgroundThreadをロックし、Looper.prepare()メソッドで生成したLooperインスタンスmLooperをLooper.myLooper()で取得する。
    public static @Nullable Looper myLooper() {
        return sThreadLocal.get();
}Looper.loop()を呼び出す。
    public static void loop() {
        final Looper me = myLooper();
        if (me == null) {
            throw new RuntimeException("No Looper; Looper.prepare() wasn't called on this thread.");
        }
        final MessageQueue queue = me.mQueue;

        // Make sure the identity of this thread is that of the local process,
        // and keep track of what that identity token actually is.
        Binder.clearCallingIdentity();
        final long ident = Binder.clearCallingIdentity();

        for (;;) {
            Message msg = queue.next(); // might block
            if (msg == null) {
                // No message indicates that the message queue is quitting.
                return;
            }

            // This must be in a local variable, in case a UI event sets the logger
            final Printer logging = me.mLogging;
            if (logging != null) {
                logging.println(">>>>> Dispatching to " + msg.target + " " +
                        msg.callback + ": " + msg.what);
            }

            final long slowDispatchThresholdMs = me.mSlowDispatchThresholdMs;

            final long traceTag = me.mTraceTag;
            if (traceTag != 0 && Trace.isTagEnabled(traceTag)) {
                Trace.traceBegin(traceTag, msg.target.getTraceName(msg));
            }
            final long start = (slowDispatchThresholdMs == 0) ? 0 : SystemClock.uptimeMillis();
            final long end;
            try {
                msg.target.dispatchMessage(msg);
                end = (slowDispatchThresholdMs == 0) ? 0 : SystemClock.uptimeMillis();
            } finally {
                if (traceTag != 0) {
                    Trace.traceEnd(traceTag);
                }
            }
            if (slowDispatchThresholdMs > 0) {
                final long time = end - start;
                if (time > slowDispatchThresholdMs) {
                    Slog.w(TAG, "Dispatch took " + time + "ms on "
                            + Thread.currentThread().getName() + ", h=" +
                            msg.target + " cb=" + msg.callback + " msg=" + msg.what);
                }
            }

            if (logging != null) {
                logging.println("<<<<< Finished to " + msg.target + " " + msg.callback);
            }

            // Make sure that during the course of dispatching the
            // identity of the thread wasn't corrupted.
            final long newIdent = Binder.clearCallingIdentity();
            if (ident != newIdent) {
                Log.wtf(TAG, "Thread identity changed from 0x"
                        + Long.toHexString(ident) + " to 0x"
                        + Long.toHexString(newIdent) + " while dispatching to "
                        + msg.target.getClass().getName() + " "
                        + msg.callback + " what=" + msg.what);
            }

            msg.recycleUnchecked();
        }
    }
主な部分だけ取り出すと、
        for (;;) {
            Message msg = queue.next(); // might block
            try {
                msg.target.dispatchMessage(msg);
            }
        }
このメッセージ処理ループがバックグラウンドスレッドで実行される。
    public void dispatchMessage(Message msg) {
        if (msg.callback != null) {
            handleCallback(msg);
        } else {
            if (mCallback != null) {
                if (mCallback.handleMessage(msg)) {
                    return;
                }
            }
            handleMessage(msg);
        }
}メッセージオブジェクトは、いわゆるメッセージだけでなく、Runnableを保持するmsg.callbackを持つ
スレッドをstartした後は、ハンドラーの生成。
mBackgroundHandler = new Handler(mBackgroundThread.getLooper());HandlerのコンストラクタにはLooperを入れている。
    public Looper getLooper() {
        if (!isAlive()) {
            return null;
        }

        // If the thread has been started, wait until the looper has been created.
        synchronized (this) {
            while (isAlive() && mLooper == null) {
                try {
                    wait();
                } catch (InterruptedException e) {
                }
            }
        }
        return mLooper;
}メインスレッドからバックグラウンドスレッドで生成されるLooperオブジェクトを取得するために、スレッド間の同期を取っている。
ひとまず、ここまででバックグラウンドスレッドが開始された状態になる。
mTextureViewのリスナーをトリガーにしてカメラの設定などを行うので、SurfaceTextureListenerを実装する。
    private final TextureView.SurfaceTextureListener mSurfaceTextureListener
            = new TextureView.SurfaceTextureListener() {
        @Override
        public void onSurfaceTextureAvailable(SurfaceTexture texture, int width, int height) {
            openCamera(width, height);
        }
        @Override
        public void onSurfaceTextureSizeChanged(SurfaceTexture texture, int width, int height) {
            configureTransform(width, height);
        }
        @Override
        public boolean onSurfaceTextureDestroyed(SurfaceTexture texture) {
            return true;
        }
        @Override
        public void onSurfaceTextureUpdated(SurfaceTexture texture) {
        }
}このリスナーの実装により、以下の流れでopenCamera()が実行される。
    private void openCamera(int width, int height) {
        if (ContextCompat.checkSelfPermission(getActivity(), Manifest.permission.CAMERA)
                != PackageManager.PERMISSION_GRANTED) {
            requestCameraPermission();
            return;
        }
        setUpCameraOutputs(width, height);
        configureTransform(width, height);
        Activity activity = getActivity();
        CameraManager manager = (CameraManager) activity.getSystemService(Context.CAMERA_SERVICE);
        try {
            if (!mCameraOpenCloseLock.tryAcquire(2500, TimeUnit.MILLISECONDS)) {
                throw new RuntimeException("Time out waiting to lock camera opening.");
            }
            manager.openCamera(mCameraId, mStateCallback, mBackgroundHandler);
        } catch (CameraAccessException e) {
            e.printStackTrace();
        } catch (InterruptedException e) {
            throw new RuntimeException("Interrupted while trying to lock camera opening.", e);
        }
}カメラのパーミッションをチェックしたあと、setUpCameraOutputs()を呼び出す。
    private void setUpCameraOutputs(int width, int height) {
        Activity activity = getActivity();
CameraManager manager = (CameraManager) activity.getSystemService(Context.CAMERA_SERVICE);CameraManagerのインスタンスを生成。
接続されているカメラのcameraIdリストをgetCameraIdList()で取得し、それぞれのカメラごとにfor文loopさせる。
        try {
for (String cameraId : manager.getCameraIdList()) {CameraManagerからCameraCharacteristicsを取得し、CameraCharacteristics.LENS_FACINGで背面カメラ、前面カメラを識別し、前面カメラの場合はcontinueでスキップする。
                CameraCharacteristics characteristics
                        = manager.getCameraCharacteristics(cameraId);
                Integer facing = characteristics.get(CameraCharacteristics.LENS_FACING);
                if (facing != null && facing == CameraCharacteristics.LENS_FACING_FRONT) {
                    continue;
} StreamConfigurationMap map = characteristics.get(
CameraCharacteristics.SCALER_STREAM_CONFIGURATION_MAP);
if (map == null) {
continue;
}
Size largest = Collections.max(
Arrays.asList(map.getOutputSizes(ImageFormat.JPEG)),
new CompareSizesByArea());最大サイズでImageReaderのインスタンスを生成し、画像が使用可能となったときのリスナーと、バックグラウンドスレッドのハンドラーを設定する。
                mImageReader = ImageReader.newInstance(largest.getWidth(), largest.getHeight(),
                        ImageFormat.JPEG, /*maxImages*/2);
                mImageReader.setOnImageAvailableListener(
mOnImageAvailableListener, mBackgroundHandler);リスナーmOnImageAvailableListenerのonImageAvailable()には、RunnableインタフェースのImageSaverインスタンスを設定。このクラスはImageReaderのキューから取得した画像をファイルに保存する。
    private final ImageReader.OnImageAvailableListener mOnImageAvailableListener
            = new ImageReader.OnImageAvailableListener() {
        @Override
        public void onImageAvailable(ImageReader reader) {
            mBackgroundHandler.post(new ImageSaver(reader.acquireNextImage(), mFile));
        }
};ハンドラーのpost()メソッドは以下。
    public final boolean post(Runnable r)
    {
       return  sendMessageDelayed(getPostMessage(r), 0);
}MessageクラスにはRunnableを格納するcallbackがあり、そこにImageSaverインスタンスを設定することで、RunnableをMessage化できる。
    private static Message getPostMessage(Runnable r) {
        Message m = Message.obtain();
        m.callback = r;
        return m;
    }
リスナーの設定の後は画面の回転の処理。ディスプレイの回転状態を取得する。
int displayRotation = activity.getWindowManager().getDefaultDisplay().getRotation();プレビュー画像のオフセット回転角度を取得する。
mSensorOrientation = characteristics.get(CameraCharacteristics.SENSOR_ORIENTATION);それぞれを考慮して、縦横サイズの交換の必要有無フラグを設定する。
                boolean swappedDimensions = false;
                switch (displayRotation) {
                    case Surface.ROTATION_0:
                    case Surface.ROTATION_180:
                        if (mSensorOrientation == 90 || mSensorOrientation == 270) {
                            swappedDimensions = true;
                        }
                        break;
                    case Surface.ROTATION_90:
                    case Surface.ROTATION_270:
                        if (mSensorOrientation == 0 || mSensorOrientation == 180) {
                            swappedDimensions = true;
                        }
                        break;
                    default:
                        Log.e(TAG, "Display rotation is invalid: " + displayRotation);
                }
縦横サイズの交換が必要あれば、SurfaceTextureサイズの縦横を入れ替えたものをプレビュー画面サイズとする。ディスプレイサイズをMaxサイズとして取得し、これも縦横交換処理をする。
                Point displaySize = new Point();
                activity.getWindowManager().getDefaultDisplay().getSize(displaySize);
                int rotatedPreviewWidth = width;
                int rotatedPreviewHeight = height;
                int maxPreviewWidth = displaySize.x;
                int maxPreviewHeight = displaySize.y;

                if (swappedDimensions) {
                    rotatedPreviewWidth = height;
                    rotatedPreviewHeight = width;
                    maxPreviewWidth = displaySize.y;
                    maxPreviewHeight = displaySize.x;
                }

                if (maxPreviewWidth > MAX_PREVIEW_WIDTH) {
                    maxPreviewWidth = MAX_PREVIEW_WIDTH;
                }

                if (maxPreviewHeight > MAX_PREVIEW_HEIGHT) {
                    maxPreviewHeight = MAX_PREVIEW_HEIGHT;
}カメラのSurfaceTextureの出力サイズリストの中から、プレビュー画像のサイズを選択する。chooseOptimalSize()は以下の優先度でサイズを選択している。
                mPreviewSize = chooseOptimalSize(map.getOutputSizes(SurfaceTexture.class),
                        rotatedPreviewWidth, rotatedPreviewHeight, maxPreviewWidth,
maxPreviewHeight, largest);その後、setAspectRatio()の中で、mTextureViewのサイズを選択したサイズのアスペクト比に変更する。
                int orientation = getResources().getConfiguration().orientation;
                if (orientation == Configuration.ORIENTATION_LANDSCAPE) {
                    mTextureView.setAspectRatio(
                            mPreviewSize.getWidth(), mPreviewSize.getHeight());
                } else {
                    mTextureView.setAspectRatio(
                            mPreviewSize.getHeight(), mPreviewSize.getWidth());
}ここまでがsetUpCameraOutputs()
サイズの例として、SO-02Jの場合、以下のようになる。
Displayサイズ
| Width | Height | アスペクト比 |
| 720 | 1184 | 45:74 縦にしたとき |
| 1184 | 720 | 74:45 横にしたとき |
TextureViewサイズ
| Width | Height | アスペクト比 |
| 720 | 1184 | 45:74 縦にしたとき |
| 1184 | 720 | 74:45 横にしたとき |
JPEGサイズ
| Width | Height | アスペクト比 |
| 3840 | 2160 | 16:9 |
| 3264 | 2448 | 4:3 |
| 2048 | 1536 | 4:3 |
| 1920 | 1080 | 16:9 |
| 1280 | 720 | 16:9 |
| 720 | 480 | 3:2 |
| 640 | 480 | 4:3 |
| 480 | 320 | 3:2 |
| 352 | 288 | 11:9 |
| 320 | 240 | 4:3 |
| 176 | 144 | 11:9 |
SurfaceTextureクラスのサイズ。Displayサイズのアスペクト比が標準的でないために条件に合致するサイズはなく、先頭が選択される。
| Width | Height | アスペクト比 |
| 3840 | 2160 | 16:9 |
| 3264 | 2448 | 4:3 |
| 2048 | 1536 | 4:3 |
| 1920 | 1080 | 16:9 |
| 1600 | 1200 | 4:3 |
| 1440 | 1080 | 4:3 |
| 1280 | 720 | 16:9 |
| 960 | 720 | 4:3 |
| 864 | 480 | 9:5 |
| 720 | 480 | 3:2 |
| 640 | 480 | 4:3 |
| 480 | 320 | 3:2 |
| 352 | 288 | 11:9 |
| 320 | 240 | 4:3 |
| 176 | 144 | 11:9 |
画面の回転処理についてSO-02Jで確認する。
まず、通常の縦持ちにしたとき
| TextureView初期状態 | プレビュー元画像 | プレビューオフセット回転画像 | TextureViewアスペクト比変更後 | 結果 |
| 720x1184 | 3840x2160 | 2160x3840 | 666x1184 | 666x1184 |
| | | | |
ディスプレイサイズを720x1280にするため、View.SYSTEM_UI_FLAG_LAYOUT_HIDE_NAVIGATIONとstyles.xmlの設定でナビゲーションバーを透過に変更する。
public class CameraActivity extends AppCompatActivity {

    @Override
    protected void onCreate(Bundle savedInstanceState) {
        super.onCreate(savedInstanceState);
        setContentView(R.layout.activity_camera);
        if (null == savedInstanceState) {
            getSupportFragmentManager().beginTransaction()
                    .replace(R.id.container, Camera2BasicFragment.newInstance())
                    .commit();
        }
    }
    @Override
    protected void onResume(){
        Log.i("Camera2BasicFragment","onResume Activity");
        super.onResume();
        findViewById(R.id.container).setSystemUiVisibility(View.SYSTEM_UI_FLAG_LAYOUT_HIDE_NAVIGATION);
    }

}
<resources>
<style name="MaterialTheme" parent="Theme.AppCompat.Light.NoActionBar">
<item name="android:windowFullscreen">true</item>
<item name="android:navigationBarColor">@android:color/transparent</item>
</style>
</resources>ただし、ナビゲーションバーを隠してもDisplayサイズはナビゲーションバーを除いた領域になってしまうため、chooseOptimalSize()のMAXサイズパラメータを変更する。(元々、プレビューサイズリストと比較するパラメータなので、回転角度によってWidth/Heightを入れ替えてしまうmaxPreviewWidthとmaxPreviewHeihtを使うと意図通りの選択ができない。)
mPreviewSize = chooseOptimalSize(map.getOutputSizes(SurfaceTexture.class),
rotatedPreviewWidth, rotatedPreviewHeight, MAX_PREVIEW_WIDTH/*maxPreviewWidth*/,
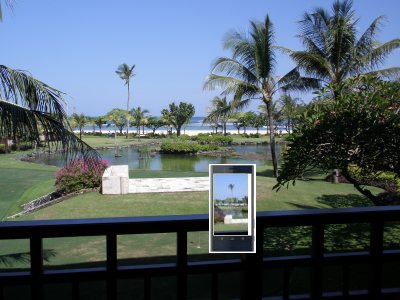
MAX_PREVIEW_HEIGHT/*maxPreviewHeight*/, largest);ナビゲーションバーを隠すと、通常の縦持ちにしたとき
| TextureView初期状態 | プレビュー元画像 | プレビューオフセット回転画像 | TextureViewアスペクト比変更後 | 結果 |
| 720x1280 | 1280x720 | 720x1280 | 720x1280 | 720x1280 |
 |  |  | |  |
スマホを左90°回転すると、
| TextureView初期状態 | プレビュー元画像 | プレビューオフセット回転画像 | 結果 |
| 1280x720 | 1280x720 | 720x1280 | 1280x720 |
 |  |  |  |
このため、回転時には取得したプレビュー画像を回転させる必要がある。MatrixクラスをsetTransform()で設定することで回転させる。
    private void configureTransform(int viewWidth, int viewHeight) {
        Activity activity = getActivity();
        if (null == mTextureView || null == mPreviewSize || null == activity) {
            return;
        }
        int rotation = activity.getWindowManager().getDefaultDisplay().getRotation();
        Matrix matrix = new Matrix();
        RectF viewRect = new RectF(0, 0, viewWidth, viewHeight);
        RectF bufferRect = new RectF(0, 0, mPreviewSize.getHeight(), mPreviewSize.getWidth());
        float centerX = viewRect.centerX();
        float centerY = viewRect.centerY();
        if (Surface.ROTATION_90 == rotation || Surface.ROTATION_270 == rotation) {
            bufferRect.offset(centerX - bufferRect.centerX(), centerY - bufferRect.centerY());
            matrix.setRectToRect(viewRect, bufferRect, Matrix.ScaleToFit.FILL);
            float scale = Math.max(
                    (float) viewHeight / mPreviewSize.getHeight(),
                    (float) viewWidth / mPreviewSize.getWidth());
            matrix.postScale(scale, scale, centerX, centerY);
            matrix.postRotate(90 * (rotation - 2), centerX, centerY);
        } else if (Surface.ROTATION_180 == rotation) {
            matrix.postRotate(180, centerX, centerY);
        }
        mTextureView.setTransform(matrix);
}このままではまだ問題があり、実際には90°から180°への回転ではディスプレイは回転しない。さらに180°から270°へ回転させたときは、ディスプレイは回転するにもかかわらずActivityの再生成は行われず、onResume()が呼ばれない。そのためconfigureTransform()も実行されず、オリジナルのサンプルアプリでは表示画像が上下反転状態になってしまう。
| 回転操作 | 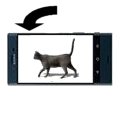 左90°回転 | 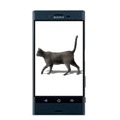 | 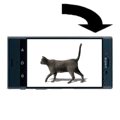 右90°回転 | 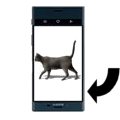 右180°回転 | 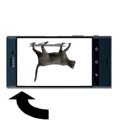 右270°回転 |
| displayRotation | ROTATION_90 | ROTATION_0 | ROTATION_270 | ROTATION_270 | ROTATION_90 |
| mSensorOrientation | 90° | 90° | 90° | 90° | 90° |
| ディスプレイ回転 | 有り | - | 有り | 無し | 有り |
| Activity再生成 | 有り | - | 有り | 無し | 無し |
onDisplayChanged()で対策する。onDisplayChanged()はActivity再生成の前に呼ばれるので、再生成されるときは改めてonResume()から設定が必要で、openCamera()内のconfigureTransform()は省略できない。
DisplayListenerリスナーを追加し、270°回転でも上下反転しないよう変更する。
public class Camera2BasicFragment extends Fragment
        implements View.OnClickListener, ActivityCompat.OnRequestPermissionsResultCallback, DisplayManager.DisplayListener {
private DisplayManager displayManager;
@Override
public void onCreate(Bundle savedInstanceState) {
super.onCreate(savedInstanceState);
Activity activity = getActivity();
displayManager = (DisplayManager) activity.getSystemService(Context.DISPLAY_SERVICE);
displayManager.registerDisplayListener(this, null);
}
@Override
public void onDisplayAdded(int displayId) {
}
@Override
public void onDisplayChanged(int displayId) {
configureTransform(mTextureView.getWidth(), mTextureView.getHeight());
}
@Override
public void onDisplayRemoved(int displayId) {
}まだopenCamera()の中身の続き。次にCameraManagerクラスを生成。
CameraManager manager = (CameraManager) activity.getSystemService(Context.CAMERA_SERVICE);カメラへの接続をopenする。セマフォを使っているのはopenとcloseを排他的に処理するためで、ここではopenが確実に完了するまで他の場所からopen/close処理が出来ないように、mCameraOpenCloseLockのパーミッションをtryAcquire()で取得する。
        try {
            if (!mCameraOpenCloseLock.tryAcquire(2500, TimeUnit.MILLISECONDS)) {
                throw new RuntimeException("Time out waiting to lock camera opening.");
            }
            manager.openCamera(mCameraId, mStateCallback, mBackgroundHandler);
        } catch (CameraAccessException e) {
            e.printStackTrace();

        } catch (InterruptedException e) {
            throw new RuntimeException("Interrupted while trying to lock camera opening.", e);
}CameraManager.openCamera()で設定されるmStateCallbackは以下。
    private final CameraDevice.StateCallback mStateCallback = new CameraDevice.StateCallback() {
        @Override
        public void onOpened(@NonNull CameraDevice cameraDevice) {
            // This method is called when the camera is opened.  We start camera preview here.
            mCameraOpenCloseLock.release();
            mCameraDevice = cameraDevice;
            createCameraPreviewSession();
        }
        @Override
        public void onDisconnected(@NonNull CameraDevice cameraDevice) {
            mCameraOpenCloseLock.release();
            cameraDevice.close();
            mCameraDevice = null;
        }
        @Override
        public void onError(@NonNull CameraDevice cameraDevice, int error) {
            mCameraOpenCloseLock.release();
            cameraDevice.close();
            mCameraDevice = null;
            Activity activity = getActivity();
            if (null != activity) {
                activity.finish();
            }
        }
};open時には、onOpened()により、
createCameraPreviewSession()の内容を順に見ていく。
SurfaceTextureクラスを取得。SurfaceTextureは、カメラプレビューの映像からフレームをキャプチャするためのクラス。
    private void createCameraPreviewSession() {
        try {
SurfaceTexture texture = mTextureView.getSurfaceTexture();SurfaceTextureのサイズを設定。
texture.setDefaultBufferSize(mPreviewSize.getWidth(), mPreviewSize.getHeight());SurfaceクラスをSurfaceTextureから生成する。Surfaceは、カメラデバイスからの出力を受け取り、ディスプレイへ表示するためのバッファをハンドルするクラス。
Surface surface = new Surface(texture);キャプチャをリクエストするため、CaptureRequest.Builderを生成し、surfaceをターゲットに追加する。
            mPreviewRequestBuilder
                    = mCameraDevice.createCaptureRequest(CameraDevice.TEMPLATE_PREVIEW);
mPreviewRequestBuilder.addTarget(surface);CameraCaptureSessionを生成する。1つ目のパラメータには、キャプチャ画像の出力先Surfaceのリストを入力する。
            mCameraDevice.createCaptureSession(Arrays.asList(surface, mImageReader.getSurface()),
new CameraCaptureSession.StateCallback() {2つ目のパラメータにCallbackを入力し、CameraCaptureSession生成時に呼ばれるonConfiguredを定義する。
                        @Override
                        public void onConfigured(@NonNull CameraCaptureSession cameraCaptureSession) {
                            // The camera is already closed
                            if (null == mCameraDevice) {
                                return;
}CaptureRequest.Builderにオートフォーカスモードの設定とフラッシュの設定を行う。
                            // When the session is ready, we start displaying the preview.
                            mCaptureSession = cameraCaptureSession;
                            try {
                                // Auto focus should be continuous for camera preview.
                                mPreviewRequestBuilder.set(CaptureRequest.CONTROL_AF_MODE,
                                        CaptureRequest.CONTROL_AF_MODE_CONTINUOUS_PICTURE);
                                // Flash is automatically enabled when necessary.
setAutoFlash(mPreviewRequestBuilder);setRepeatingRequestにより、繰り返しキャプチャをリクエストする。キャプチャが繰り返されるごとに、mBackgroundHandlerがハンドルするバックグラウンドスレッドで、mCaptureCallbackが呼び出される。
                                // Finally, we start displaying the camera preview.
                                mPreviewRequest = mPreviewRequestBuilder.build();
                                mCaptureSession.setRepeatingRequest(mPreviewRequest,
                                        mCaptureCallback, mBackgroundHandler);
                            } catch (CameraAccessException e) {
                                e.printStackTrace();
                            }
                        }

                        @Override
                        public void onConfigureFailed(
                                @NonNull CameraCaptureSession cameraCaptureSession) {
                            showToast("Failed");
                        }
                    }, null
);mCaptureCallbackでは、独自に定義したmStateによって、ステータス処理をしている。プレビュー中は特に処理は不要。写真撮影時に、オートフォーカスと自動露出の状況に合わせて、captureStillPicture()を呼び出し、繰り返しキャプチャをStopして、ターゲットをTextureViewではなくImageReaderのSurfaceに切り替えて、1回のキャプチャを実行する。撮影すると、ImageReaderのonImageAvailableがリスナーとして呼び出され、画像が保存される。
    private CameraCaptureSession.CaptureCallback mCaptureCallback
            = new CameraCaptureSession.CaptureCallback() {

        private void process(CaptureResult result) {
            switch (mState) {
                case STATE_PREVIEW: {
                    // We have nothing to do when the camera preview is working normally.
                    break;
                }
                case STATE_WAITING_LOCK: {
                    Integer afState = result.get(CaptureResult.CONTROL_AF_STATE);
                    if (afState == null) {
                        captureStillPicture();
                    } else if (CaptureResult.CONTROL_AF_STATE_FOCUSED_LOCKED == afState ||
                            CaptureResult.CONTROL_AF_STATE_NOT_FOCUSED_LOCKED == afState) {
                        // CONTROL_AE_STATE can be null on some devices
                        Integer aeState = result.get(CaptureResult.CONTROL_AE_STATE);
                        if (aeState == null ||
                                aeState == CaptureResult.CONTROL_AE_STATE_CONVERGED) {
                            mState = STATE_PICTURE_TAKEN;
                            captureStillPicture();
                        } else {
                            runPrecaptureSequence();
                        }
                    }
                    break;
                }
                case STATE_WAITING_PRECAPTURE: {
                    // CONTROL_AE_STATE can be null on some devices
                    Integer aeState = result.get(CaptureResult.CONTROL_AE_STATE);
                    if (aeState == null ||
                            aeState == CaptureResult.CONTROL_AE_STATE_PRECAPTURE ||
                            aeState == CaptureRequest.CONTROL_AE_STATE_FLASH_REQUIRED) {
                        mState = STATE_WAITING_NON_PRECAPTURE;
                    }
                    break;
                }
                case STATE_WAITING_NON_PRECAPTURE: {
                    // CONTROL_AE_STATE can be null on some devices
                    Integer aeState = result.get(CaptureResult.CONTROL_AE_STATE);
                    if (aeState == null || aeState != CaptureResult.CONTROL_AE_STATE_PRECAPTURE) {
                        mState = STATE_PICTURE_TAKEN;
                        captureStillPicture();
                    }
                    break;
                }
            }
}OpenCVのソースコードはC/C++なので、JavaとC/C++をインタフェースするJNI(Java Native Interface)と呼ばれるnativeメソッドを介して実行可能になる。
JNIのサンプルとして、https://developer.android.com/samples/からHello JNIをダウンロードしてopenする。
nativeコードを含むため、CPUを気にする必要がある。app\build.gradleを確認する。
apply plugin: 'com.android.application'

android {
    compileSdkVersion 28
    defaultConfig {
        applicationId 'com.example.hellojni'
        minSdkVersion 23
        targetSdkVersion 28
        versionCode 1
        versionName "1.0"
    }
    buildTypes {
        release {
            minifyEnabled false
            proguardFiles getDefaultProguardFile('proguard-android.txt'),
                    'proguard-rules.pro'
        }
    }
    externalNativeBuild {
        cmake {
            path "src/main/cpp/CMakeLists.txt"
        }
    }

    flavorDimensions 'cpuArch'
    productFlavors {
        arm7 {
            dimension 'cpuArch'
            ndk {
                abiFilters 'armeabi-v7a'
            }
        }
        arm8 {
            dimension 'cpuArch'
            ndk {
                abiFilters 'arm64-v8a'
            }
        }
        x86 {
            dimension 'cpuArch'
            ndk {
                abiFilters 'x86'
            }
        }
        x86_64 {
            dimension 'cpuArch'
            ndk {
                abiFilters 'x86_64'
            }
        }
        universal {
            dimension 'cpuArch'
            // include all default ABIs. with NDK-r16,  it is:
            //   armeabi-v7a, arm64-v8a, x86, x86_64
        }
    }
}

dependencies {
    implementation fileTree(dir: 'libs', include: ['*.jar'])
    implementation 'com.android.support:appcompat-v7:28.0.0'
    implementation 'com.android.support.constraint:constraint-layout:1.1.3'
}
Android Studioでビルドするときに、ターゲットCPUを選択できるようになる。universalを選べばすべてのApplication Binary Interface (ABI)が生成される。
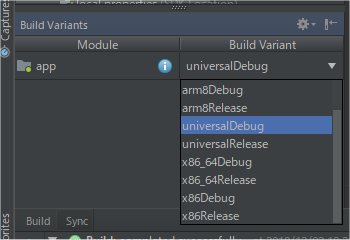
生成されたAPKファイルを解凍してみると、すべてのABI向けにlibhello-jni.soが出来ていることが分かる。
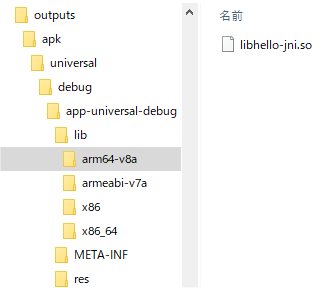
CMakeファイルのadd_libraryでソースファイルhello-jni.cをコンパイルしたライブラリhello-jniを追加する。target_link_libraries文についてはHello Worldでは不要。
cmake_minimum_required(VERSION 3.4.1)

add_library(hello-jni SHARED
            hello-jni.c)

# Include libraries needed for hello-jni lib
target_link_libraries(hello-jni
                      android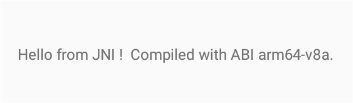
log)SO-02Jで実行すると、SO-02JのABIがarm64-v8aと分かる。
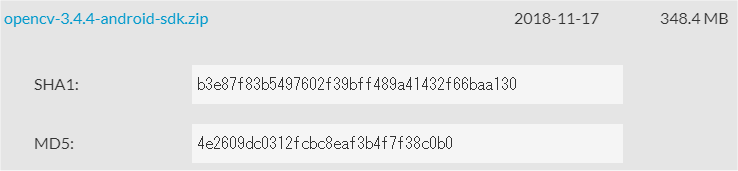
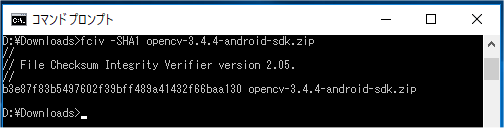
https://opencv.org/に行き、RELEASESから、Android Packをダウンロードする。
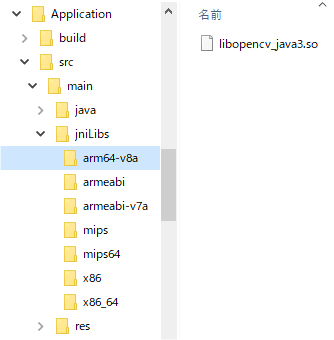
まず、OpenCV-android-sdk/sdk/native/libs配下にある、各CPUごとのnativeライブラリファイルlibopencv_java3.soを取り込むため、mainの下にjniLibsディレクトリを作成し、ライブラリファイルをコピーする。
次に、OpenCV-android-sdk/sdk/javaをプロジェクトディレクトリ直下へコピー、ディレクトリ名をopencvに変更する。
opencvディレクトリにあるマニフェストファイルのSDK Versionを削除する。
<?xml version="1.0" encoding="utf-8"?>
<manifest xmlns:android="http://schemas.android.com/apk/res/android"
      package="org.opencv"
      android:versionCode="3440"
      android:versionName="3.4.4">
</manifest>新たに以下内容のbuild.gradleをopencvディレクトリに置く。
buildscript {
    repositories {
        jcenter()
        google()
    }
    dependencies {
        classpath 'com.android.tools.build:gradle:3.2.1'
    }
}
apply plugin: 'com.android.library'
repositories {
    jcenter()
    google()
}
android {
    compileSdkVersion 28
    defaultConfig {
        minSdkVersion 23
        targetSdkVersion 28
    }
    buildTypes {
        release {
            minifyEnabled false
            proguardFiles getDefaultProguardFile('proguard-android.txt'), 'proguard-rules.txt'
        }
    }
    compileOptions {
        sourceCompatibility JavaVersion.VERSION_1_8
        targetCompatibility JavaVersion.VERSION_1_8
    }
    sourceSets {
        main {
            manifest.srcFile 'AndroidManifest.xml'
            java.srcDirs = ['src']
            resources.srcDirs = ['src']
            res.srcDirs = ['res']
            aidl.srcDirs = ['src']
        }
    }
}settings.gradleにopencvのincludeを追加。
include 'Application'
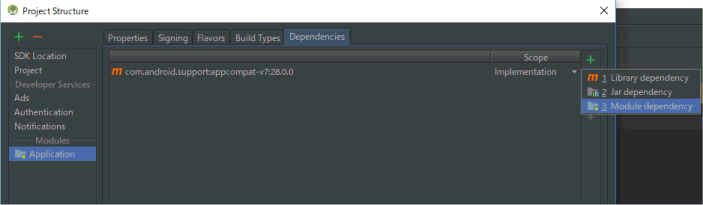
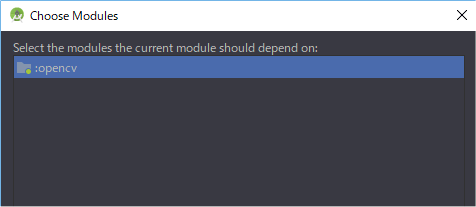
include "opencv"Module Dependencyにopencvを追加する。
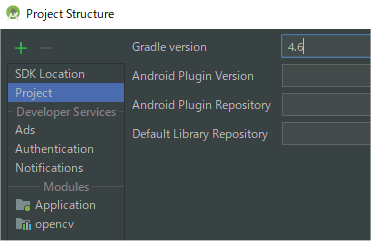
Gradleバージョンを最新にする。
Applicationディレクトリのbuild.gradleを最新バージョンで整理する。
buildscript {
    repositories {
        jcenter()
        google()
    }
    dependencies {
        classpath 'com.android.tools.build:gradle:3.2.1'
    }
}
apply plugin: 'com.android.application'
repositories {
    jcenter()
    google()
}
dependencies {
    implementation 'com.android.support:appcompat-v7:28.0.0'
    implementation project(':opencv')
}
android {
    compileSdkVersion 28
    defaultConfig {
        minSdkVersion 23
        targetSdkVersion 28
    }
    compileOptions {
        sourceCompatibility JavaVersion.VERSION_1_8
        targetCompatibility JavaVersion.VERSION_1_8
    }
    sourceSets {
        main {
            java.srcDirs "src/main/java"
            res.srcDirs "src/main/res"
        }
        androidTest.setRoot('tests')
        androidTest.java.srcDirs = ['tests/src']
    }
}
nativeライブラリをロードするコードを追加する。
public class Camera2BasicFragment extends Fragment
        implements View.OnClickListener, ActivityCompat.OnRequestPermissionsResultCallback, DisplayManager.DisplayListener {

    static {
        System.loadLibrary("opencv_java3");
}Camera2Basicサンプルは、プレビュー画像をそのままTextureViewへ送っていたが、OpenCVで画像処理するために、Matクラスへ変換する必要がある。OpenCVライブラリではJavaCamera2Viewを使えばカメラ画像をMatクラスで取得できるが、使ってみると色がおかしく、画面サイズや回転の制御も出来ないので使わない。
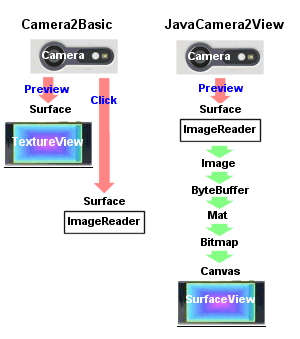
CameraDeviceのプレビュー画像はYUV_420_888。撮影時のみ使っていたImageReaderを、プレビュー用にJPEGからYUV_420_888に変更する。
                mImageReader = ImageReader.newInstance(mPreviewSize.getWidth(), mPreviewSize.getHeight(),
                        ImageFormat.YUV_420_888, /*maxImages*/2);
RGBがRed/Green/Blueの3原色で色を表すのに対して、YUVフォーマットは、輝度Y、青と輝度の差U、赤と輝度の差V、の3つで色を表す。この分け方により、U/Vの情報を減らしても画質の劣化が分かりづらくなり、圧縮しやすくなるというフォーマット。444が圧縮なし、422がU/Vをそれぞれ水平方向のみ2分の1、420がU/Vをそれぞれ水平・垂直両方2分の1に圧縮し、2x2の4ピクセルあたり、輝度Yはピクセル分4つを保持するが、色差情報UとVはそれぞれ1つだけとなる。
YUV420

このフォーマットに加えて、Y、U、V、各プレーンデータのbuffer配置方法にいくつも種類がある。
I420

N12

N21

ただし、Androidの場合、プレーンデータの順序は固定であることが保証されている。
U、VのPixel Stride = 2、Row Stride = 6の場合

が保証される。
実際には

となるので、planes[1]を使うとN12相当になるが、JavaCamera2ViewはYUV_420_888のplanes[1]をN21で変換してしまっているため、色差プレーンが逆になり、色がおかしくなる。
        <activity
            android:name=".CameraActivity"
            android:screenOrientation="portrait"
android:label="@string/app_name"> private static Bitmap mCacheBitmap;
protected void AllocateCache()
{
mCacheBitmap = Bitmap.createBitmap(mPreviewSize.getHeight(), mPreviewSize.getWidth(), Bitmap.Config.ARGB_8888);
} @Override
public void onOpened(@NonNull CameraDevice cameraDevice) {
// This method is called when the camera is opened. We start camera preview here.
mCameraOpenCloseLock.release();
mCameraDevice = cameraDevice;
if(mCacheBitmap==null) {
AllocateCache();
}
createCameraPreviewSession();
} private static boolean ftakepicture; @Override
public void onClick(View view) {
switch (view.getId()) {
case R.id.picture: {
ftakepicture=true;
break;
} private void SavePreview(){
try {
Date mDate = new Date();
SimpleDateFormat fileName = new SimpleDateFormat("yyyMMddHHmmss", Locale.JAPAN);
FileOutputStream fos = null;
fos = new FileOutputStream(new File(getActivity().getExternalFilesDir(Environment.DIRECTORY_PICTURES), "pic_"+fileName.format(mDate) + ".jpg"));
mCacheBitmap.compress(Bitmap.CompressFormat.JPEG, 100, fos);
fos.close();
}catch(Exception e){
e.printStackTrace();
}
}以上を踏まえてonImageAvailable()を変更する。これで、Matクラスに変換したうえでカメラプレビューと撮影ができるようになった。
    private final ImageReader.OnImageAvailableListener mOnImageAvailableListener
            = new ImageReader.OnImageAvailableListener() {

        @Override
        public void onImageAvailable(ImageReader reader) {
            try {
                if (!mCameraOpenCloseLock.tryAcquire(2500, TimeUnit.MILLISECONDS)) {
                    throw new RuntimeException("Time out waiting to lock camera opening.");
                }

                Image mImage = reader.acquireLatestImage();
                if(mImage==null){
                    mCameraOpenCloseLock.release();
                    return;
                }

                int planenum = 4;
                int w = mImage.getWidth();
                int h = mImage.getHeight();

                Image.Plane[] planes = mImage.getPlanes();
                ByteBuffer yplane = planes[0].getBuffer();
                ByteBuffer uplane = planes[1].getBuffer();
                ByteBuffer vplane = planes[2].getBuffer();
                int uvps = planes[1].getPixelStride(); // = planes[2].getPixelStride();
                int uvrs = planes[1].getRowStride(); // = planes[2].getRowStride();

                byte[] data = new byte[w * h * planenum];

                int yint = 0;
                int uint = 0;
                int vint = 0;
                int rint = 0;
                int gint = 0;
                int bint = 0;
                if (uvps == 1) { // yplane=YYYYYYYY.. / uplane=UUUU.. / vplane=VVVV..
                    for (int y = 0; y < h; y++) {
                        for (int x = 0; x < w; x++) {
                            if (yplane.limit() > x + y * w) {
                                yint = (0xff & yplane.get(x + y * w));
                            } else {
                                yint = 0;
                            }
                            if ((x & 1) == 0) {
                                if (uplane.limit() > (x / 2) + (y / 2) * uvrs) {
                                    uint = (0xff & uplane.get((x / 2) + (y / 2) * uvrs));
                                    uint = uint - 128;
                                } else {
                                    uint = 0;
                                }
                                if (vplane.limit() > (x / 2) + (y / 2) * uvrs) {
                                    vint = (0xff & vplane.get((x / 2) + (y / 2) * uvrs));
                                    vint = vint - 128;
                                } else {
                                    vint = 0;
                                }
                            }
                            // ITU-R BT. 709
                            rint = yint + (vint * 1575) / 1000;
                            gint = yint - (uint * 187) / 1000 - (vint * 468) / 1000;
                            bint = yint + (uint * 1856) / 1000;
                            if (rint < 0) { rint = 0; } else if (rint > 255) { rint = 255; }
                            if (gint < 0) { gint = 0; } else if (gint > 255) { gint = 255; }
                            if (bint < 0) { bint = 0; } else if (bint > 255) { bint = 255; }
                            data[x * planenum + y * planenum * w] = (byte) rint;
                            data[x * planenum + y * planenum * w + 1] = (byte) gint;
                            data[x * planenum + y * planenum * w + 2] = (byte) bint;
                            data[x * planenum + y * planenum * w + 3] = (byte) 0xff;
                        }
                    }
                } else { // yplane=YYYYYYYY.. / uplane=UVUV.. / vplane=VUVU..
                    for (int y = 0; y < h; y++) {
                        for (int x = 0; x < w; x++) {
                            if (yplane.limit() > x + y * w) {
                                yint = (0xff & yplane.get(x + y * w));
                            } else {
                                yint = 0;
                            }
                            if ((x & 1) == 0) {
                                if (uplane.limit() > x + (y / 2) * uvrs) {
                                    uint = (0xff & uplane.get(x + (y / 2) * uvrs));
                                    uint = uint - 128;
                                } else {
                                    uint = 0;
                                }
                                if (vplane.limit() > x + (y / 2) * uvrs) {
                                    vint = (0xff & vplane.get(x + (y / 2) * uvrs));
                                    vint = vint - 128;
                                } else {
                                    vint = 0;
                                }
                            }
                            // ITU-R BT. 709
                            rint = yint + (vint * 1575) / 1000;
                            gint = yint - (uint * 187) / 1000 - (vint * 468) / 1000;
                            bint = yint + (uint * 1856) / 1000;
                            if (rint < 0) { rint = 0; } else if (rint > 255) { rint = 255; }
                            if (gint < 0) { gint = 0; } else if (gint > 255) { gint = 255; }
                            if (bint < 0) { bint = 0; } else if (bint > 255) { bint = 255; }
                            data[x * planenum + y * planenum * w] = (byte) rint;
                            data[x * planenum + y * planenum * w + 1] = (byte) gint;
                            data[x * planenum + y * planenum * w + 2] = (byte) bint;
                            data[x * planenum + y * planenum * w + 3] = (byte) 0xff;
                        }
                    }
                }
                Mat rgbamat = new Mat(h, w, CvType.CV_8UC4);
                rgbamat.put(0, 0, data);
                if(mSensorOrientation==90 || mSensorOrientation==270) {
                    Core.flip(rgbamat.t(), rgbamat, 1);
                }
                Utils.matToBitmap(rgbamat, mCacheBitmap);
                if(mCacheBitmap!=null) {
                    Canvas canvas = mTextureView.lockCanvas();
                    canvas.drawBitmap(mCacheBitmap, 0, 0, PAINT);
                    mTextureView.unlockCanvasAndPost(canvas);
                    if(ftakepicture) {
                        SavePreview();
                        ftakepicture=false;
                    }
                }
                mImage.close();
            }catch(Exception e) {
                Log.i(TAG, e.toString());
            }
            mCameraOpenCloseLock.release();
        }
};ようやく、まずは既存のカスケードファイルを使って顔認識をしてみる。カスケードファイルはWindows向けのOpenCVをダウンロードすると入っている。main/res/rawディレクトリにカスケードファイルhaarcascade_frontalface_alt.xmlを入れておき、onCreate()内でCascadeClassifierクラスを生成する。
    public void onCreate(Bundle savedInstanceState) {
        super.onCreate(savedInstanceState);
        Activity activity = getActivity();
        File mCascadeFile;
        try {
            InputStream is = activity.getResources().openRawResource(R.raw.haarcascade_frontalface_alt);
            File cascadeDir = activity.getDir("cascade", Context.MODE_PRIVATE);
            mCascadeFile = new File(cascadeDir, "haarcascade.xml");
            FileOutputStream os = new FileOutputStream(mCascadeFile);

            byte[] buffer = new byte[4096];
            int bytesRead;
            while ((bytesRead = is.read(buffer)) != -1) {
                os.write(buffer, 0, bytesRead);
            }
            is.close();
            os.close();

            mJavaDetector = new CascadeClassifier(mCascadeFile.getAbsolutePath());
            if (mJavaDetector.empty()) {
                Log.e("tag", "Failed to load cascade classifier");
                mJavaDetector = null;
            } else
                Log.i("tag", "Loaded cascade classifier from " + mCascadeFile.getAbsolutePath());

            cascadeDir.delete();

        } catch (IOException e) {
            e.printStackTrace();
            Log.e("tag", "Failed to load cascade. Exception thrown: " + e);
        }
}onImageAvailable()内でMatデータをグレーMatに変換し、CascadeClassifier.detectMultiScaleメソッドで顔検出する。
                Mat rgbamat = new Mat(h, w, CvType.CV_8UC4);
                Mat graymat = new Mat(h, w, CvType.CV_8UC1);
                rgbamat.put(0, 0, data);
                Imgproc.cvtColor(rgbamat, graymat, Imgproc.COLOR_RGB2GRAY);
                if(mSensorOrientation==90 || mSensorOrientation==270) {
                    Core.flip(rgbamat.t(), rgbamat, 1);
                    Core.flip(graymat.t(), graymat, 1);
                }

                MatOfRect faces = new MatOfRect();
                float mRelativeFaceSize   = 0.15f;
                float mRelativeFaceMaxSize   = 0.35f;
                if (mAbsoluteFaceSize == 0) {
                    if (w>h) {
                        mAbsoluteFaceSize = Math.round(h * mRelativeFaceSize);
                    }else{
                        mAbsoluteFaceSize = Math.round(w * mRelativeFaceSize);
                    }
                }
                if (mAbsoluteFaceMaxSize == 0){
                    if (w>h) {
                        mAbsoluteFaceMaxSize = Math.round(h * mRelativeFaceMaxSize);
                    }else{
                        mAbsoluteFaceMaxSize = Math.round(w * mRelativeFaceMaxSize);
                    }
                }

                mJavaDetector.detectMultiScale(graymat, faces, 1.1, 3, 2,
                        new org.opencv.core.Size(mAbsoluteFaceSize, mAbsoluteFaceSize), new org.opencv.core.Size(mAbsoluteFaceMaxSize, mAbsoluteFaceMaxSize));
                Rect[] facesArray = faces.toArray();
                for (int i = 0; i < facesArray.length; i++)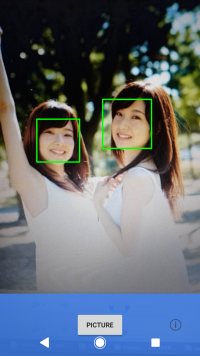
Imgproc.rectangle(rgbamat, facesArray[i].tl(), facesArray[i].br(), FACE_RECT_COLOR, 3);上のCascadeClassifier.detectMultiScaleの設定では、カスケードファイルによる特徴検出を、顔サイズを画面幅の35%から15%まで1/1.1ずつ小さくしながら、各サイズごとに画面の端から端まで特徴検査を行う。隣接3か所で検出をして初めて検出判定となる。