
監視カメラの作り方
[必要なものを買う]
- Raspberry Pi 3 model B
最近は価格が高騰してしまってます。3Bでなくてもカメラを接続できるバージョンであれば使えるはずです。https://www.raspberrypi.com/products/ - USB電源アダプター
Raspberry Piに電源アダプタがついていない場合、別で購入します。 - Piカメラ NoIR V2
Raspberry Pi専用カメラ。 - Piカメラケーブル
カメラに元々ついてるケーブルは短すぎるので、長めのケーブルに交換して使うためのものです。 - SDカード
Raspberry Piを起動するOSを入れるために必要。 - ハードディスク
デフォルトだとSDカードにすべてのデータを保存しますが、ハードディスクを使うようにします。 - 赤外線センサー
監視カメラを起動するのに使用する赤外線センサー。 - ジャンパワイヤー
赤外線センサーの接続などに使います。
[起動SDカードを準備する]
- Raspberry Pi Imagerをインストールする
https://www.raspberrypi.com/software/から、Raspberry Pi Imagerをダウンロードしてインストールします。 - OSを選ぶ
Raspberry Pi OS (other)からRaspberry Pi OS (32-bit) Liteを選びます。監視カメラとして屋外を撮影できる場所に置くのでGUIは不要で、コンソールのみの軽いOSを選んでます。4GBのSDカードでも入ります。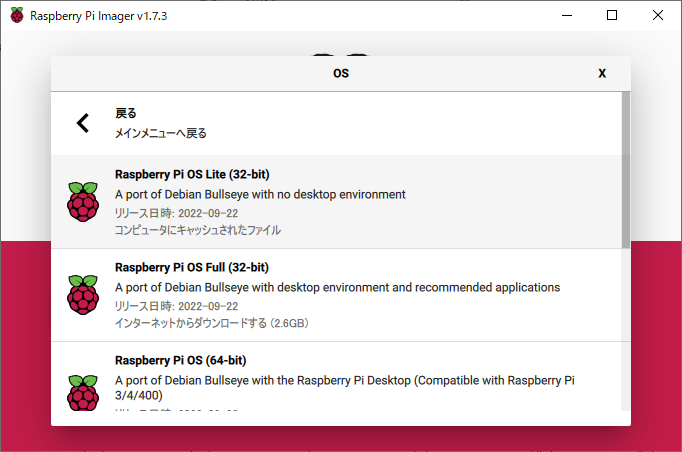
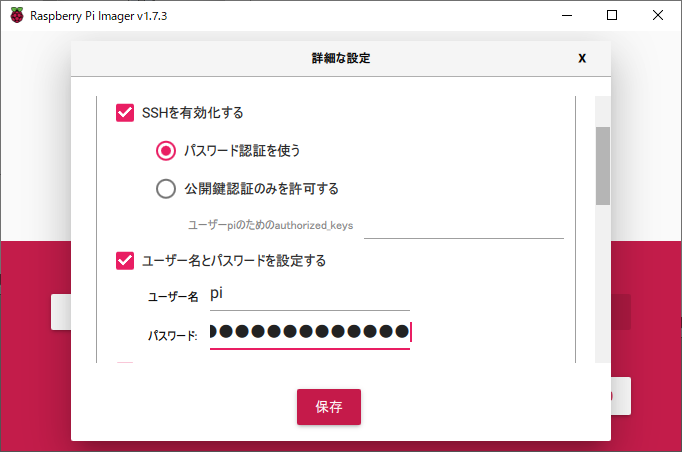
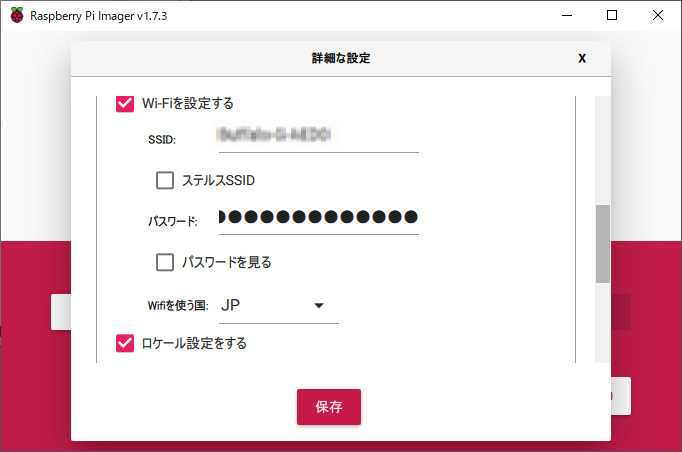
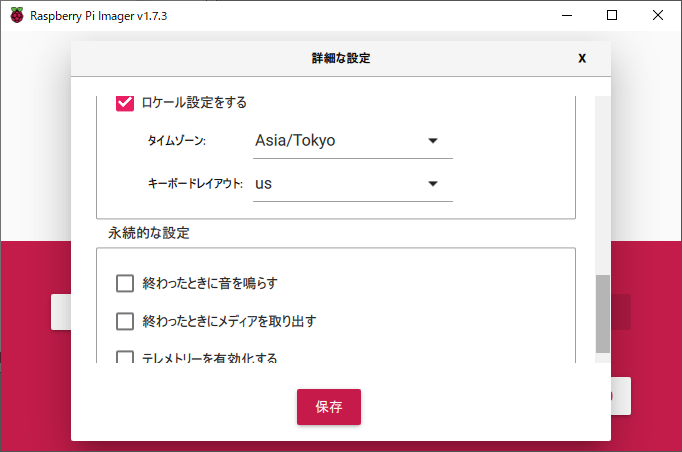
- 設定をする
Wifiなどの設定をします。Raspberry Pi Imagerを使えば、最初からネットワーク接続可能なOSイメージを作成できます。SSHを有効化しておけば、最初からネットワーク経由でPCからアクセスできます。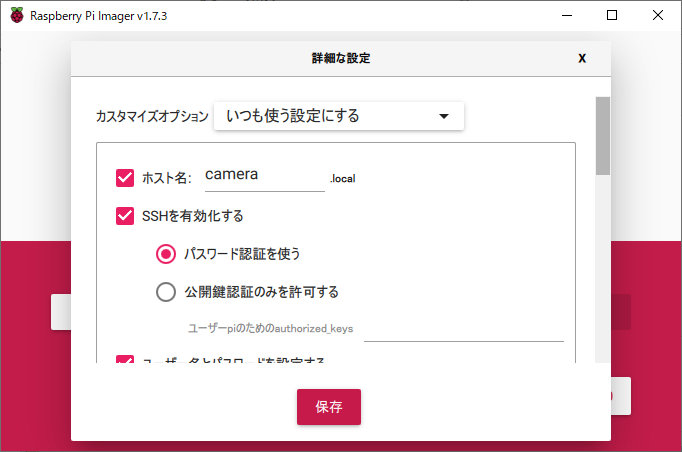
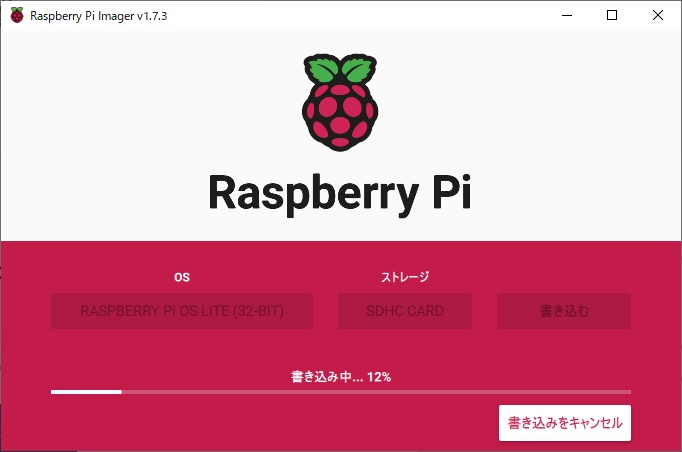
- microSDカードに書き込む。
[起動する]
- SDカードを挿入する
- 電源を入れる
Raspberry Piには電源ボタン等ありません。USB電源アダプタを接続すると起動します。 - IPアドレスを確認する
方法は2種類あります。- 電源を入れるときに、HDMIケーブルでテレビなどのモニタと接続し、USBマウス、USBキーボードを接続しておき、モニタに表示されるコンソールでifconfigコマンドを入力してIPアドレスを確認する。「inet」の後ろがIPアドレス。
pi@camera:~ $ ifconfig wlan0 wlan0: flags=4163<UP,BROADCAST,RUNNING,MULTICAST> mtu 1500 inet 192.168.1.24 netmask 255.255.255.0 broadcast 192.168.1.255 inet6 xxxx:xxxx:xxxx:xxxx:fba:3ba3:d73c:288 prefixlen 64 scopeid 0x0<global> inet6 fe80::312a:c668:80e6:8014 prefixlen 64 scopeid 0x20<link> ether b8:27:eb:xx:xx:xx txqueuelen 1000 (Ethernet) RX packets 264380 bytes 365250974 (348.3 MiB) RX errors 0 dropped 0 overruns 0 frame 0 TX packets 132057 bytes 15052092 (14.3 MiB) TX errors 0 dropped 0 overruns 0 carrier 0 collisions 0 - 家のルータ設定から、新たに接続された端末のIPアドレスを見つける。
- 電源を入れるときに、HDMIケーブルでテレビなどのモニタと接続し、USBマウス、USBキーボードを接続しておき、モニタに表示されるコンソールでifconfigコマンドを入力してIPアドレスを確認する。「inet」の後ろがIPアドレス。
- PCにターミナルソフトをインストールする
Tera TermなどのSSHログインのできるソフトをインストールします。 - UNIX上でのテキストファイル編集方法
テキストファイルの編集方法は、こちらhttps://atmarkit.itmedia.co.jp/ait/articles/1712/06/news013.htmlなどを参考に。以下なんどもテキストファイルの編集が必要になります。また、sudoコマンドを最初につけることにより、スーパーユーザーの権限が必要なコマンドを実行することができます。sudo vi [ファイル名]、でスーパーユーザー権限でテキストの編集が出来ます。 - ターミナルソフトからSSH接続する
確認したIPアドレスに、PCからSSH接続します。
ログインIDとパスワードはSDカードイメージを作成したときに設定したものです。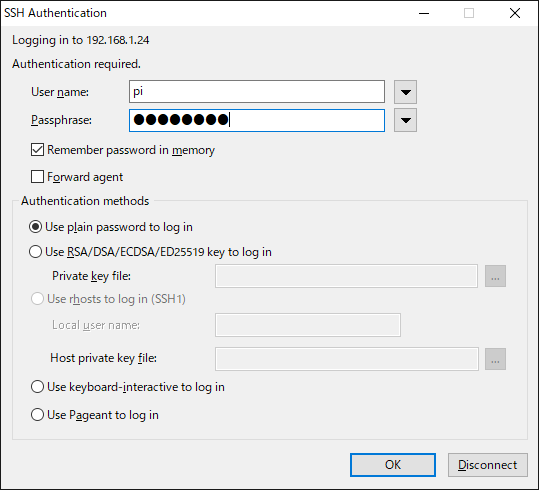
[保存先をSDカードからハードディスクに切り替える]
- ハードディスクを接続する
ハードディスクをUSB接続します。PCのように、接続しただけで使えるようにはなりません。 - 接続を確認します
pi@camera:~ $ lsusb Bus 001 Device 004: ID 0411:02cc BUFFALO INC. (formerly MelCo., Inc.) HD-EDS-A Bus 001 Device 003: ID 0424:ec00 Microchip Technology, Inc. (formerly SMSC) SMSC9512/9514 Fast Ethernet Adapter Bus 001 Device 002: ID 0424:9514 Microchip Technology, Inc. (formerly SMSC) SMC9514 Hub Bus 001 Device 001: ID 1d6b:0002 Linux Foundation 2.0 root hub - パーティションの確認
sudo fdisk -lでパーティションを確認できます。(一部省略)
pi@camera:~ $ sudo fdisk -l Disk /dev/mmcblk0: 3.8 GiB, 4008706048 bytes, 7829504 sectors Device Boot Start End Sectors Size Id Type /dev/mmcblk0p1 8192 532479 524288 256M c W95 FAT32 (LBA) /dev/mmcblk0p2 532480 7829503 7297024 3.5G 83 Linux Disk /dev/sda: 1.8 TiB, 2000398934016 bytes, 3907029168 sectors Device Boot Start End Sectors Size Id Type /dev/sda1 64 3907029119 3907029056 1.8T 7 HPFS/NTFS/exFAT - パーティションの変更
sudo fdisk /dev/sda でハードディスクのパーティション変更を開始します。ハードディスクの内容は全て消去されます。
Command : d で既存のパーティションを消します。pi@camera:~ $ sudo fdisk /dev/sda Welcome to fdisk (util-linux 2.33.1). Changes will remain in memory only, until you decide to write them. Be careful before using the write command.
Command : n で1つ目のパーティションを作ります。Command (m for help): d Selected partition 1 Partition 1 has been deleted.
ファイルサーバ用に、2つ目のパーティションを作ります。2つ目を作らない場合、1つ目のLast sectorの入力をせずEnterでdefaultのままにします。Command (m for help): n Partition type p primary (0 primary, 0 extended, 4 free) e extended (container for logical partitions) Select (default p): p Partition number (1-4, default 1): First sector (2048-3907029167, default 2048): Last sector, +/-sectors or +/-size{K,M,G,T,P} (2048-3907029167, default 3907029167): +800G Created a new partition 1 of type 'Linux' and of size 800 GiB.
Command : w で変更を確定して書き込みます。これでハードディスクの中身は全部消えますので注意。Command (m for help): n Partition type p primary (1 primary, 0 extended, 3 free) e extended (container for logical partitions) Select (default p): p Partition number (2-4, default 2): First sector (1677723648-3907029167, default 1677723648): Last sector, +/-sectors or +/-size{K,M,G,T,P} (1677723648-3907029167, default 3907029167): Created a new partition 2 of type 'Linux' and of size 1 TiB.Command (m for help): w The partition table has been altered. Calling ioctl() to re-read partition table. Syncing disks. - フォーマット
Linuxのファイルシステムext4でフォーマットします。(/dev/sda2も同様)pi@camera:~ $ sudo mkfs.ext4 /dev/sda1 mke2fs 1.44.5 (15-Dec-2018) Creating filesystem with 209715200 4k blocks and 52428800 inodes Filesystem UUID: 2124281e-6fb1-4dda-81a2-7fe990301dce Superblock backups stored on blocks: 32768, 98304, 163840, 229376, 294912, 819200, 884736, 1605632, 2654208, 4096000, 7962624, 11239424, 20480000, 23887872, 71663616, 78675968, 102400000 Allocating group tables: 0/6400 done Writing inode tables: 0/6400 done Creating journal (262144 blocks): done Writing superblocks and filesystem accounting information: 0/6400 done - データのコピー
SDカードに書き込んだRaspberry Pi OSは、パーティション/dev/mmcblk0p1がbootディレクトリ、/dev/mmcblk0p2がルートシステムファイルに割り当てられています。
bootディレクトリはSDカードのままにし、ルートファイルシステムをハードディスクへコピーします。パーティションまるごとクローンするのにddコマンドを使います。途中経過など表示してくれませんので止まったように見えますがしばらく時間かかります。Device Boot Start End Sectors Size Id Type /dev/mmcblk0p1 8192 532479 524288 256M c W95 FAT32 (LBA) /dev/mmcblk0p2 532480 7829503 7297024 3.5G 83 Linux
ファイルシステムのチェックと修正を行います。エラーがあると修正するか聞かれるのでyes。pi@camera:~ $ sudo dd if=/dev/mmcblk0p2 of=/dev/sda1 7297024+0 records in 7297024+0 records out 3736076288 bytes (3.7 GB, 3.5 GiB) copied, 904.685 s, 4.1 MB/s
クローンしたパーティションをハードディスク側のパーティションサイズに戻します。pi@camera:~ $ sudo e2fsck -f /dev/sda1 e2fsck 1.44.5 (15-Dec-2018) rootfs: recovering journal Pass 1: Checking inodes, blocks, and sizes Pass 2: Checking directory structure Pass 3: Checking directory connectivity Pass 4: Checking reference counts Pass 5: Checking group summary information Free blocks count wrong (570755, counted=570785). Fix<y>? yes Free inodes count wrong (180829, counted=180895). Fix<y>? yes rootfs: ***** FILE SYSTEM WAS MODIFIED ***** rootfs: 44449/225344 files (0.3% non-contiguous), 341343/912128 blocks
ブート時にマウントするルートディレクトリをSDカード(/dev/mmcblk0p2)からハードディスク(/dev/sda1)に変更します。/boot/cmdline.txtのroot=PARTUUID=のところを変更します。pi@camera:~ $ sudo resize2fs /dev/sda1 resize2fs 1.44.5 (15-Dec-2018) Resizing the filesystem on /dev/sda1 to 209715200 (4k) blocks. The filesystem on /dev/sda1 is now 209715200 (4k) blocks long.
/dev/sda1に対応するPARTUUIDは、blkidコマンドでわかります。pi@camera:~ $ cat /boot/cmdline.txt console=serial0,115200 console=tty1 root=PARTUUID=b4997375-01 rootfstype=ext4 elevator=deadline fsck.repair=yes rootwait
pi@camera:~ $ sudo blkid
/dev/mmcblk0p1: LABEL_FATBOOT="boot" LABEL="boot" UUID="AE82-4BC1" BLOCK_SIZE="512" TYPE="vfat" PARTUUID="6301e9a2-01"
/dev/mmcblk0p2: LABEL="rootfs" UUID="6d2ff93e-eacd-415c-96d5-4611ad21e05f" BLOCK_SIZE="4096" TYPE="ext4" PARTUUID="6301e9a2-02"
/dev/sda1: LABEL="rootfs" UUID="6d2ff93e-eacd-415c-96d5-4611ad21e05f" BLOCK_SIZE="4096" TYPE="ext4" PARTUUID="b4997375-01"
/dev/sda2: UUID="05fa010d-bb53-4b06-9c5a-ad4832e07ec9" BLOCK_SIZE="4096" TYPE="ext4" PARTUUID="b4997375-02"
[ファイルサーバを作る]
- sambaをインストールする
pi@camera:~ $ sudo apt install samba samba-common-bin (省略) - fstabを編集する
以下のように、/dev/mmcblk0p2(SDカードのルートディレクトリ用パーティション)に対応するPARTUUIDを/dev/sda1(ハードディスクのルートディレクトリ用パーティション)に差し替え、/dev/sda2(ハードディスクのファイルサーバ用パーティション)に対応するPARTUUIDを追加します。pi@camera:~ $ sudo vi /etc/fstabproc /proc proc defaults 0 0 PARTUUID=6301e9a2-01 /boot vfat defaults 0 2 #PARTUUID=6301e9a2-02 / ext4 defaults,noatime 0 1 PARTUUID=b4997375-01 / ext4 defaults,noatime 0 1 PARTUUID=b4997375-02 /var/share ext4 defaults,noatime 0 2 # a swapfile is not a swap partition, no line here # use dphys-swapfile swap[on|off] for that - smb.confを編集する
以下を末尾に追加します。pi@camera:~ $ sudo vi /etc/samba/smb.conf[samba] path = /var/share writable = yes guest ok = yes guest only = yes create mode = 0777 directory mode = 0777 share modes = yes hide unreadable = yes - 再起動
rebootコマンドで再起動します。
これで、このハードディスクのパーティションをPCからファイルサーバとして使用することができます。¥¥192.168.1.24のようにIPアドレスをエクスプローラのアドレスに入力すると、「samba」というネットワークフォルダが見えるようになります。pi@camera:~ $ sudo reboot
スマホからもアクセスできるので、写真の受け渡しなど便利です。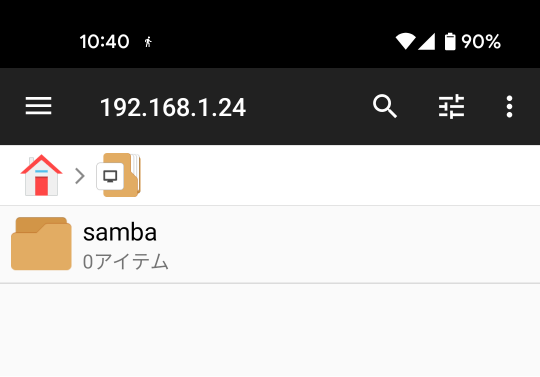
[FTPサーバをインストールする]
- インストール
PCからファイルを転送するときのため、FTPサーバを入れます。vsftpdをインストールします。インストール前にupdateとupgrade実施しておきます。
/etc/vsftpd.confを以下変更します。たいていは、「#」でコメントアウト(無効化)されているだけなので、#を削除で有効になります。pi@camera:~ $ sudo apt update (省略) pi@camera:~ $ sudo apt upgrade (省略) pi@camera:~ $ sudo apt install vsftpd (省略)
テキストファイルで/etc/vsftpd.chroot_listを作成して1行だけユーザー名追加。デフォルトユーザー名ならpiの2文字だけのテキストファイル。anonymous_enable=NO local_enable=YES write_enable=YES local_umask=022 ascii_upload_enable=YES ascii_download_enable=YES chroot_local_user=YES chroot_list_enable=YES chroot_list_file=/etc/vsftpd.chroot_list - リスタート&再起動
serviceコマンドでリスタートし、rebootコマンドで再起動します。pi@camera:~ $ sudo service vsftpd restart Stopping FTP server: vsftpd. Starting FTP server: vsftpd. pi@camera:~ $ sudo reboot
[Piカメラ制御ライブラリをインストールする]
- インストール
Piカメラの制御ライブラリをインストールします。pi@camera:~ $ sudo apt install python3-picamera - 定義の追加
'greyworld'がpicameraライブラリで定義されていないので、/usr/lib/python3/dist-packages/picameraディレクトリにあるcamera.pyとmmal.pyにそれぞれ定義の追加が必要です。
[camera.py] AWB_MODESの定義部分を検索し、一番下のgreyworldの行を追加します。
[mmal.py] MMAL_PARAM_AWBMODE_Tの定義部分を検索し、一番下のMMAL_PARAM_AWBMODE_GREYWORLDを追加します。range(10)もrange(11)に変更します。AWB_MODES = { 'off': mmal.MMAL_PARAM_AWBMODE_OFF, 'auto': mmal.MMAL_PARAM_AWBMODE_AUTO, 'sunlight': mmal.MMAL_PARAM_AWBMODE_SUNLIGHT, 'cloudy': mmal.MMAL_PARAM_AWBMODE_CLOUDY, 'shade': mmal.MMAL_PARAM_AWBMODE_SHADE, 'tungsten': mmal.MMAL_PARAM_AWBMODE_TUNGSTEN, 'fluorescent': mmal.MMAL_PARAM_AWBMODE_FLUORESCENT, 'incandescent': mmal.MMAL_PARAM_AWBMODE_INCANDESCENT, 'flash': mmal.MMAL_PARAM_AWBMODE_FLASH, 'horizon': mmal.MMAL_PARAM_AWBMODE_HORIZON, 'greyworld': mmal.MMAL_PARAM_AWBMODE_GREYWORLD, }MMAL_PARAM_AWBMODE_T = ct.c_uint32 # enum ( MMAL_PARAM_AWBMODE_OFF, MMAL_PARAM_AWBMODE_AUTO, MMAL_PARAM_AWBMODE_SUNLIGHT, MMAL_PARAM_AWBMODE_CLOUDY, MMAL_PARAM_AWBMODE_SHADE, MMAL_PARAM_AWBMODE_TUNGSTEN, MMAL_PARAM_AWBMODE_FLUORESCENT, MMAL_PARAM_AWBMODE_INCANDESCENT, MMAL_PARAM_AWBMODE_FLASH, MMAL_PARAM_AWBMODE_HORIZON, MMAL_PARAM_AWBMODE_GREYWORLD, ) = range(11)
[OpenCVをインストールする]
- OpenCVは画像処理のライブラリです。
pi@camera:~ $ sudo apt install python3-opencv
[Apache2をインストールする]
- インストール
ホームページを作るため、Webサーバソフトを入れます。apache2をインストールします。
pi@camera:~ $ sudo apt install apache2 (省略) - アカウントを追加する
ホームページ管理専用のアカウントを作成します。ユーザー名wwwとします。パスワード設定し、その他の入力は不要。最後にY。pi@camera:~/camera $ sudo adduser www Adding user `www' ... Adding new group `www' (1001) ... Adding new user `www' (1001) with group `www' ... Creating home directory `/home/www' ... Copying files from `/etc/skel' ... New password: Retype new password: passwd: password updated successfully Changing the user information for www Enter the new value, or press ENTER for the default Full Name []: Room Number []: Work Phone []: Home Phone []: Other []: Is the information correct? [Y/n] Y - envvarsを更新する
管理ユーザー名を更新します。/etc/apache2/envvarsの以下の部分をwww-dataからwwwに変更します。export APACHE_RUN_USER=www-data export APACHE_RUN_GROUP=www-data
[PHPをインストールする]
- PHPはサーバ側で動作するプログラム言語です。
pi@camera:~ $ sudo apt install php
[ffmpegをインストールする]
- ffmpegは動画変換ソフトです。
pi@camera:~ $ sudo apt install ffmpeg
[cpulimitをインストールする]
- cpulimitはffmpegでタイムラプスを作成するとき、CPUの発熱をおさえるために使います。
pi@camera:~ $ sudo apt install cpulimit
[Piカメラを接続する]
- ケーブルを接続する
Piカメラの接続方法はこちらhttps://projects.raspberrypi.org/ja-JP/projects/getting-started-with-picamera/2 - Piカメラの使用を許可する
設定画面を開きます。
上下左右キーとEnterキーで[Interface Options]を選択します。pi@camera:~ $ sudo raspi-config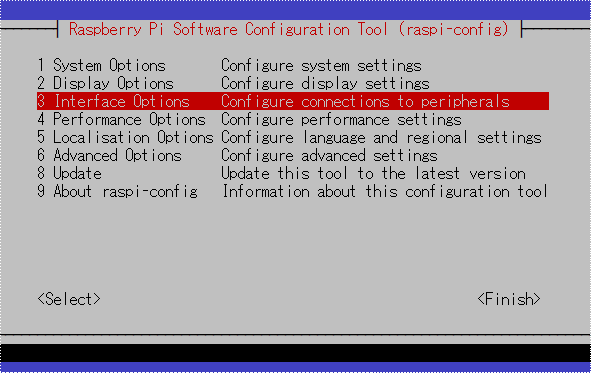
同様に[Legacy Camera]を選んでEnableにします。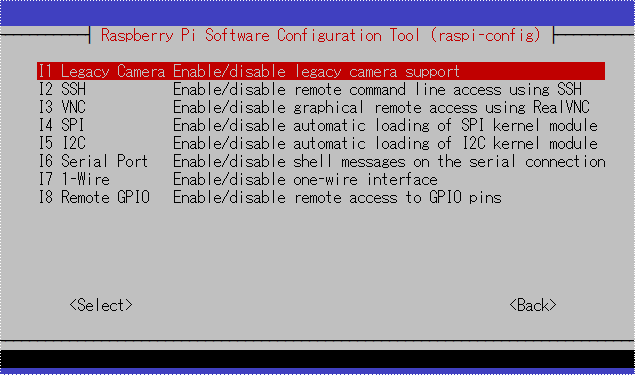
変更後はReboot(再起動)しますので、一旦SSH接続が切れます。しばらく再起動を待ち、再度SSH接続します。
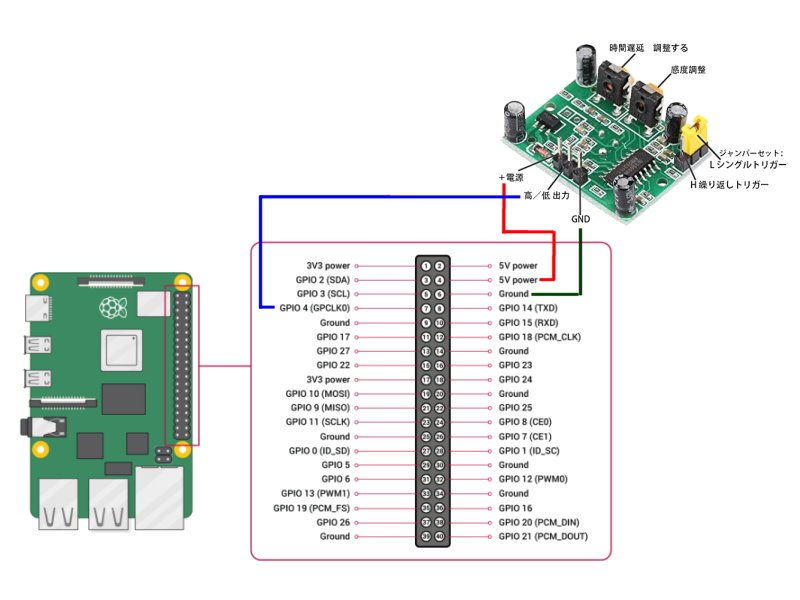
[赤外線センサーを接続する]
- ジャンパワイヤーで以下のように接続します。GPIO4を赤外線センサーからの入力信号として使用します。
[メインプログラムを設定する]
- ディレクトリを作る
プログラム実行のホームディレクトリを/home/pi/camera/とし、撮影画像の保存先は/home/pi/camera/large/となります。
ホームページ作成用のwwwアカウントでログインし、/home/www/timelapseディレクトリを作成してパーミッションを変更しておきます。pi@camera:~ $ pwd /home/pi pi@camera:~ $ mkdir camera pi@camera:~ $ cd camera/ pi@camera:~/camera $ mkdir largewww@camera:~ $ pwd /home/www www@camera:~ $ mkdir timelapse www@camera:~ $ chmod 777 timelapse - PCにFTPソフトをインストールする
WinSCPなどのファイル転送のできるソフトをインストールします。 - ダウンロード
以下のファイルをダウンロードする。
detector.zip
または、FTPソフトは使わず、Raspberry Piから直接ダウンロードすることもできます。pi@camera:~/camera $ wget https://hinakin.main.jp/detector.zip - FTPソフトからファイルを転送する
作成したディレクトリ/home/pi/camera/に、PCからdetector.zipを転送します。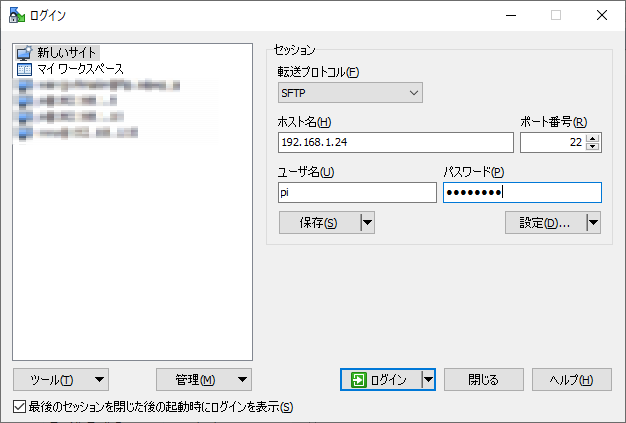
- 解凍する
unzipコマンドで解凍します。pi@camera:~/camera $ unzip detector.zip Archive: detector.zip inflating: detector.py inflating: detector.service inflating: index.php inflating: line.sh inflating: timelapse.sh inflating: vhosts.conf - detector.pyの編集
- ホームディレクトリが/home/pi/camera/と異なる場合、homedirのところを変更します。
- 忘れ物チェックパネルの作り方で作った別のRaspberry Piにファイル名を送信する場合、homeenableをTrueにして、送信先のIPアドレスとポート番号を設定します。
- カメラ検知したときにLINEグループへ通知する場合、lineenableをTrueにして、line.shをホームディレクトリに置きます。
#!/usr/bin/env python3 ################################################################################################### # <設定> # # ホームディレクトリ ========================================================================= # このファイルを置くディレクトリ homedir = '/home/pi/camera/' # # home.pyの実行Raspberry PiのIPアドレスとポート番号 ========================================== # 別のRaspberry Piにファイル名を送信する場合、homeenableをTrueにして、送信先のIPアドレスとポート番号を設定します。 homeenable = False homeipaddress = '192.168.1.10' homeportaddress = 54321 # # LINE通知 ============================================================================== # カメラ検知したときにLINEグループへ通知する場合、lineenableをTrueにして、line.shをホームディレクトリに置きます。 lineenable = False # # その他 ================================================================================ SLEEPTIME = 1.1 # Sleep time in normal run. 1.1S. THRESHOLD = 30 # Difference detection threshold (~255) WIDTH = 640 # Width for analysis. HEIGHT = 480 # Height for analysis. DETECTSIZE = WIDTH*HEIGHT/300 # Detection size criteria. FRAMERATE = 30 # Fixed frame rate. RECINTERVAL = 60 # Interval of recording. 1min. MAXRECTIME = 300 # Max recording number. MAXTEMP = 65 # Max temperature. ################################################################################################### # インクルードファイル import sys import syslog import cv2 as cv import numpy as np import subprocess import picamera import picamera.array import datetime import concurrent.futures import glob import RPi.GPIO as GPIO from time import sleep from fractions import Fraction import socket import os import time ################################################################################################### # ファイル名の送信 def sendfilename(str): global homeipaddress, homeportaddress filename = str.encode('utf-8') try: camerasocket = socket.socket(socket.AF_INET, socket.SOCK_STREAM) camerasocket.connect((homeipaddress, homeportaddress)) camerasocket.send(filename) except Exception as e: print(e) finally: camerasocket.close() ################################################################################################### # Piカメラ初期化 camera = picamera.PiCamera() camera.resolution = (WIDTH, HEIGHT) camera.framerate = FRAMERATE camera.iso = 0 camera.saturation = 0 camera.rotation = 180 camera.awb_mode = 'greyworld' stream = picamera.array.PiRGBArray(camera) ################################################################################################### # OpenCV Mat (numpy array) preimg = np.zeros([HEIGHT, WIDTH, 3], np.uint8) # Previous image kernel = np.ones((5,5),np.uint8) # Morphology ################################################################################################### # Others初期化 slptime = SLEEPTIME # Sleep time imgfilename = '' # Image file name numimg = 1 # Serial number for image file name recording = False # Recording flag nodetectcounter = 0 # Recording interval counter timercounter = 0 # Timer now = datetime.datetime.now() datenow = now.strftime('%Y%m%d') datepre = datenow sn = 1 # Serial number 1-9999 in one day emergency = False # Emergent Stop night = 0 # Night flag 0:day 1:evening 2:night nightcounter = 0 # Night Check Counter searchfile = homedir+"/large/" + now.strftime('%Y%m%d') + "*.jpg" files = glob.glob(searchfile) max = 0 for filename in files: num = int(filename[31:35]) if max < num: max = num if max > sn: sn = max + 1 if sn > 9999: sn = 9999 emergency = True GPIO.setmode(GPIO.BCM) GPIO.setup(4,GPIO.IN) gpiodetect = False ################################################################################################### # LINE通知シェル実行 def sendmessage(img_name, imgarray): global lineenable, homedir, homeenable cv.imwrite(img_name, imgarray) if homeenable: sendfilename(os.path.basename(img_name)) if lineenable: subprocess.run([homedir+'/line.sh', img_name ], encoding='utf-8', stdout=subprocess.DEVNULL) ################################################################################################### # タイムラプスシェル実行 def maketimelapse(tl_name): global homedir subprocess.run([homedir+'/timelapse.sh', tl_name], encoding='utf-8', stdout=subprocess.DEVNULL) ################################################################################################### # イメージ保存 def saveimage(img_name, imgarray): cv.imwrite(img_name, imgarray) ################################################################################################### # メインプログラム try: executor = concurrent.futures.ThreadPoolExecutor(max_workers=10) camera.start_preview() sleep(5) camera.capture(stream, 'bgr', use_video_port=False) preimg = cv.blur(stream.array, (5,5)) syslog.syslog(syslog.LOG_INFO, 'start') while emergency == False: if slptime > 0: sleep(slptime) timercounter+=slptime+1 stream.truncate(0) gpiodetect = GPIO.input(4) camera.capture(stream, 'bgr', use_video_port=False) imgblur = cv.blur(stream.array, (5,5)) diff = cv.absdiff(preimg,imgblur) ret, th = cv.threshold(diff, THRESHOLD, 255, cv.THRESH_BINARY) mor = cv.morphologyEx(th, cv.MORPH_CLOSE, kernel) grayimg = cv.cvtColor(mor, cv.COLOR_BGR2GRAY) contours, hierarchy = cv.findContours(grayimg, cv.RETR_EXTERNAL, cv.CHAIN_APPROX_SIMPLE) contoursizemax = 0 contouri = 0 i = 0 for contour in contours: contoursize = cv.contourArea(contour) if contoursize > contoursizemax: contoursizemax = contoursize contouri = i i+=1 if contoursizemax > DETECTSIZE and gpiodetect == True: # Detect nodetectcounter = 0 dtstamp = datetime.datetime.now().strftime('%Y-%m-%d %H:%M:%S') cv.putText(stream.array, dtstamp, (402,22), cv.FONT_HERSHEY_SIMPLEX, 0.5, (0,0,0), 1, cv.LINE_AA) cv.putText(stream.array, dtstamp, (400,20), cv.FONT_HERSHEY_SIMPLEX, 0.5, (255,255,255), 1, cv.LINE_AA) if not recording: now = datetime.datetime.now() recording = True numimg = 1 contimg = cv.drawContours(stream.array, contours, contouri, (0,255,0), 1) imgfilename = homedir + '/large/' + now.strftime('%Y%m%d_') + '%04d.jpg' % sn sn+=1 if sn > 9999: recording = False emergency = True syslog.syslog(syslog.LOG_ERR, 'file nu,mber over') cnt=contours[contouri] rightmost = tuple(cnt[cnt[:,:,0].argmax()][0]) if numimg == 1 and rightmost[0] < 600: executor.submit(sendmessage, imgfilename, contimg) else: executor.submit(saveimage, imgfilename, stream.array) numimg+=1 if numimg > MAXRECTIME: # Emergent stop recording = False emergency = True syslog.syslog(syslog.LOG_ERR, 'recording time over') elif numimg > 30: # Slowest capture slptime = 10 elif numimg > 10: # Slower capture slptime = 2 else: slptime = 0 elif recording: nodetectcounter+=slptime+1 if numimg > 30: # Slowest capture slptime = 10 elif numimg > 10: # Slower capture slptime = 2 else: slptime = 0 if nodetectcounter > RECINTERVAL: # Finish recording nodetectcounter = 0 recording = False slptime = SLEEPTIME preimg = imgblur.copy() if timercounter > 60 and not recording: sum = cv.sumElems(stream.array)[0] if sum < 500000 and night == 0: night = 1 syslog.syslog(syslog.LOG_INFO, 'Night detected.') camera.iso = 800 camera.framerate = 3 camera.awb_mode = 'off' camera.awb_gains = (Fraction(8, 1), Fraction(8, 1)) camera.shutter_speed = 300000 camera.saturation = 100 elif sum > 60000000 and night == 1: camera.awb_mode = 'auto' night = 0 syslog.syslog(syslog.LOG_INFO, 'Morning detected.') camera.iso = 0 camera.framerate = FRAMERATE camera.awb_mode = 'greyworld' camera.shutter_speed = 0 camera.saturation = 0 cp = subprocess.run(['vcgencmd', 'measure_temp'], encoding='utf-8', stdout=subprocess.PIPE) tempnow = float(cp.stdout[5:9]) if tempnow > MAXTEMP: emergency = True syslog.syslog(syslog.LOG_ERR, 'over temperature') now2 = datetime.datetime.now() datepre = datenow datenow = now2.strftime('%Y%m%d') if datepre != datenow: executor.submit(maketimelapse, datepre) sn=1 timercounter = 0 camera.stop_preview() finally: GPIO.cleanup(4) camera.close() executor.shutdown() syslog.syslog(syslog.LOG_INFO, 'end') - line.shの編集
LINEで専用のグループを作り、LINE Notify(https://notify-bot.line.me/ja/)でログイン後、マイページから対象のグループのアクセストークンを発行します。line.shのtokenのところに取得したトークンを記入します。#!/bin/bash filename="$1" tp=`vcgencmd measure_temp 2>&1` token="ここにトークンを記入する" curl -s -X POST -H "Authorization: Bearer ${token}" -F "message = ${tp}" -F "imageFile=@${filename}" https://notify-api.line.me/api/notify - vhosts.confの編集
Webサーバ用のバーチャルホストファイルです。「VirtualHost」の後ろのIPアドレスを実際のIPアドレスに変更し、メールアドレスのところを管理者のメールアドレスに変更します。<VirtualHost 192.168.1.24:80> ServerAdmin メールアドレス DocumentRoot /home/www <Directory /> Options FollowSymLinks AllowOverride None </Directory> <Directory /home/www> Options FollowSymLinks AllowOverride None Require all granted </Directory> </VirtualHost> - timelapse.sh
編集の必要はありません。/home/pi/camera/large/ディレクトリの画像からタイムラプスを作成し、/home/www/timelapse/ディレクトリへ保存するスクリプトです。それぞれのディレクトリはあらかじめ作成しておく必要があります。#!/bin/bash photo_file="$1" cpulimit -q -l 50 -- ffmpeg -loglevel quiet -y -r 10 -i /home/pi/camera/large/${photo_file}_%04d.jpg -r 10 /home/www/timelapse/${photo_file}.mp4
[スワップファイルサイズを変更する]
- デフォルトのままだとタイムラプス作成時にメモリ不足になるので、/etc/dphys-swapfileを編集して、以下のCONF_SWAPSIZEを100(MB)から2048(MB)に変更してsystemctlコマンドでdphys-swapfileをrestartさせます。
CONF_SWAPSIZE=100pi@camera:~/camera $ sudo vi /etc/dphys-swapfile pi@camera:~/camera $ sudo systemctl restart dphys-swapfile.service
[Webサーバを設定する]
- バーチャルホストファイルを設定する
解凍して編集したvhosts.confをmvコマンドで/etc/apache2/sites-available/ディレクトリに移動し、lnコマンドで/etc/apache2/sites-enabled/ディレクトリにリンクファイルを作成します。mvコマンドの最後のドット「.」は、元のファイル名と同じという意味です。この場合vhosts.confと同じとなります。pi@camera:~/camera $ sudo mv -i vhosts.conf /etc/apache2/sites-available/. pi@camera:~/camera $ cd /etc/apache2/sites-enabled pi@camera:/etc/apache2/sites-enabled $ sudo ln -s /etc/apache2/sites-available/vhosts.conf . - index.phpを置く
ホームページ作成用のwwwアカウントでログインし、解凍したindex.phpをcpコマンドで/home/www/ディレクトリにコピーします。www@camera:~ $ pwd /home/www www@camera:~ $ cp -i /home/pi/camera/temp/index.php .<?php $week = [ "日", //0 "月", //1 "火", //2 "水", //3 "木", //4 "金", //5 "土", //6 ]; $work =<<<HTM1 <!DOCTYPE html> <head> <title>HOME</title> <meta name="viewport" content="width=device-width, initial-scale=1"> </head> <body> HTM1; print($work); date_default_timezone_set("Asia/Tokyo"); for($minus=1; $minus<7; $minus++){ $file = "timelapse/".date("Ymd", strtotime("-${minus} day", time())).".mp4"; $strdate = date("Ymd", strtotime("-${minus} day", time()))."(".$week[date("w", strtotime("-${minus} day", time()))].")"; if(is_file($file)){ print("<h2>"); print($strdate); print("</h2><video controls width='320px' height='240px'><source src='"); print(htmlspecialchars($file)); print("'></video><br>"); } } $work =<<<HTM2 </body> HTM2; print($work); ?>
[自動起動を設定する]
- 解凍したdetector.serviceをmvコマンドで/etc/systemd/system/ディレクトリに置きます。
[detector.service]pi@camera:~/camera $ sudo mv -i detector.service /etc/systemd/system/.[Unit] Description=detector After=network-online.target [Service] ExecStart=/home/pi/camera/detector.py Restart=always [Install] WantedBy=multi-user.target - systemctlコマンドでサービスをenableにし、startします。statusで状態確認できます。enable設定により、rebootしたときに自動で起動します。
停止するときはstopです。sudo systemctl enable detector.service sudo systemctl start detector.service sudo systemctl status detector.servicesudo systemctl stop detector.service
[別のRaspberry Piへ撮影画像を共有できるようにする]
- NFSインストール
pi@camera:~/camera $ sudo apt install nfs-kernel-server - 共有ディレクトリを作る
共有用のディレクトリを作成します。pi@camera:~/camera $ sudo mkdir -p /export/camera pi@camera:~/camera $ sudo chmod -R 777 /export - 共有ディレクトリにマウント設定する
/etc/fstabを編集します。
一番下の行を追記します。pi@camera:~/camera $ sudo vi /etc/fstabproc /proc proc defaults 0 0 PARTUUID=6301e9a2-01 /boot vfat defaults 0 2 #PARTUUID=6301e9a2-02 / ext4 defaults,noatime 0 1 PARTUUID=b4997375-01 / ext4 defaults,noatime 0 1 PARTUUID=b4997375-02 /var/share ext4 defaults,noatime 0 2 # a swapfile is not a swap partition, no line here # use dphys-swapfile swap[on|off] for that /home/pi/camera /export/camera none bind 0 0 - 共有ディレクトリを定義する
/etc/exportsを編集します。
以下を追記します。「192.168.1」の部分は、使用しているネットワークのIPアドレスに合わせてください。pi@camera:~/camera $ sudo vi /etc/exports/export 192.168.1.0/24(rw,fsid=0,insecure,no_subtree_check,async) /export/camera 192.168.1.0/24(rw,nohide,insecure,no_subtree_check,async) - 再起動
rebootコマンドで再起動します。pi@camera:~ $ sudo reboot
[プログラムの説明]
- 試行錯誤の結果、検出には赤外線センサーを使っています。画像だけでは、太陽が雲に隠れたのと、人が現れたのを簡単には区別出来ない。
- 検出後は、画像の動体検知で画像を保存し、差分検出した1枚目の画像だけ、検出した差分輪郭を足して、屋内のRaspberry PiとLINEへ送ります。
- 庭掃除など、カメラの前で長時間動くこともあるため、連続検出するにつれて撮影間隔を延ばします。
- 約1分以上、動体検知がなければ、いなくなったと判断し、撮影を停止します。
- 日付が変わったら、前日の画像をまとめてタイムラプス動画にします。
- 撮影に空白期間が出来ないように、LINE送信とタイムラプス作成はThreadPoolExecutorで並列処理します。
- 夜間はAuto設定のままだと真っ黒になるので、暗くなったらISO、Gain、シャッタースピードを限界まで手動で変更します。十分明るくなったら元に戻します。戻すときはGainをAutoにするため、一旦awb_modeは'auto'にします。
- 各処理にかかる時間。
Capture処理は、VideoポートとStillポートで画質と速度が違います。はっきりと差が分かるくらい画質が変わるので、Stillポートを使用します。カメラ撮影 0.7秒(use_video_port=False) グレースケール変換 0.01秒 画像差分取得 0.0005秒 モルフォロジー変換 0.006秒 差分輪郭取得 0.0008秒 JPEG保存 0.25秒(検出時のみ)
<3.5m先のカレンダーで比較>Videoポート
use_video_port=True
0.35秒Stillポート
use_video_port=False
0.7秒
- 画像は/home/pi/large/ディレクトリ、タイムラプスは/home/www/timelapse/ディレクトリに保存されます。
- http://192.168.1.24のように、実際のIPアドレスをブラウザで閲覧すると、直近のタイムラプスを見ることができます。